

One of the unsung heroes to me in Power BI desktop (or Power Query in Excel) is how wonderfully simple it is to combine csv or Excel files from a folder. Maybe it’s not totally unsung, but I think it’s an everyday problem that many people have to deal with. It could easily be an entry point for many new users to see just how much easier Power Query can make their lives.
As much as I appreciate how easy the tool allows us to automatically combine files without having to write any code, I never like all those extra queries that get created in my file and so I prefer to simplify it by just writing one magical little line of code. But I always got frustrated because my one line of code left me without proper column headers, so my one line of code turned into a few extra cumbersome steps. In this post, I’ll show you how to slightly modify that one line of code to get the column headers and keep your queries clean and simple.
First, let’s look at what we get with the automatic way of combining files. I have three csv files that I’d like to combine. They look like this:


The first step is to choose to Get Data, and select “Folder”, and then click the Connect button.

After browsing to a file path and clicking OK, you’ll get a screen that shows the files in the selected folder, and a few different buttons.

To let Power BI do all the work for you, just click the “Combine & Transform Data” button. You’ll then see a screen that gives you a couple of choices to change how the files are combined, but in most cases you’ll just select the default and let it do its thing.

After clicking the OK button, Power BI will do it’s magic to create the queries to combine all of these files for you. You’ll see something like the queries below:
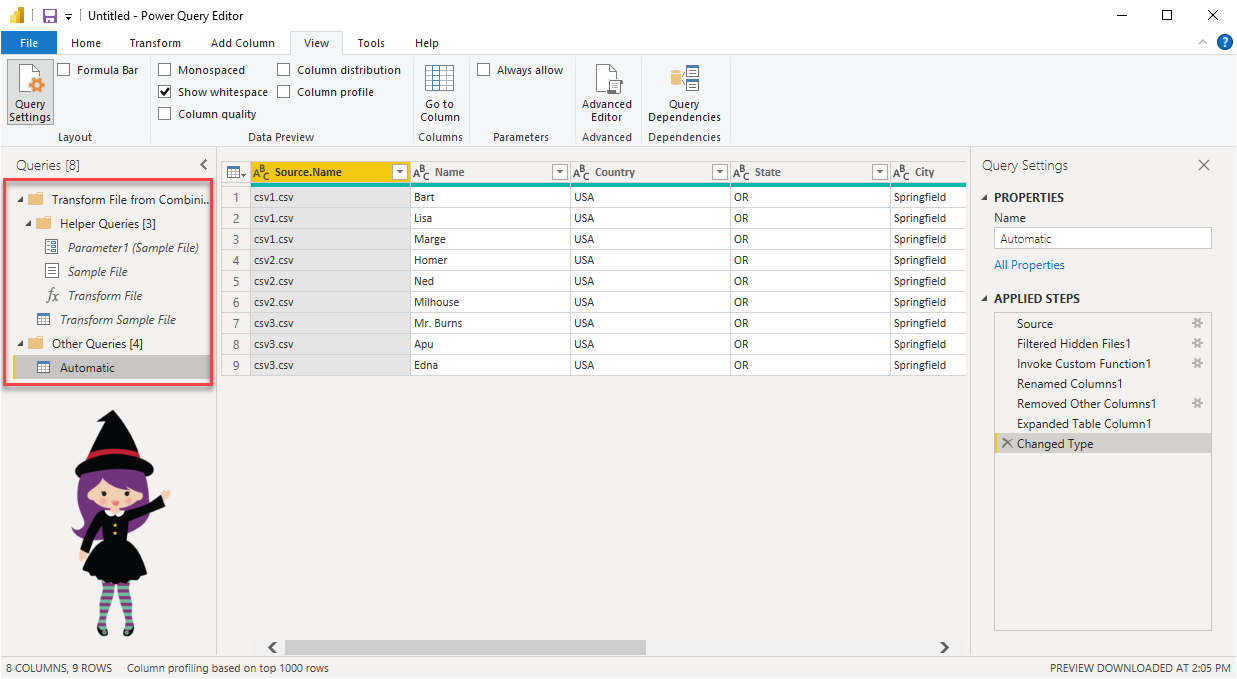
In many cases this will be just what the user wants. Simple, easy, and the files are magically combined! However, I just don’t like all those extra queries that end up under the “Transform File from…” folder (outlined in red in the image above). I would like something that results in fewer queries. To do that, we can go back to the step where we clicked the big yellow button labeled “Combine & Transform Data.” Instead of clicking that button, we click the slightly less obvious button simply labeled “Transform Data.” This will bring up the Power Query window with just a single step in this query that just shows what files are in the selected folder.

The trick is to explicitly tell Power BI what that binary content is in the “Content” column. To do that, go to the “Add Column” tab, choose “Custom Column”, and type in the following for the formula (where “Content” is the name of the column that holds the Binary data):
= Csv.Document([Content])

2. Click Custom Column
3. Enter the formula Csv.Document([Content])
4. Click the OK button
This adds a new column to your output with the csv content (you can also do this for Excel files by using Excel.Workbook instead of Csv.Document). If you click inside one of the cells of the new column (without clicking on the word “Table”), you will get a preview below of the content. Notice how the column headers are all “Column 1, Column 2, Column3, etc.”

Now all that’s needed is to expand that Custom column and your csvs will be combined! Beautiful! Except…. those columns headers need some attention.


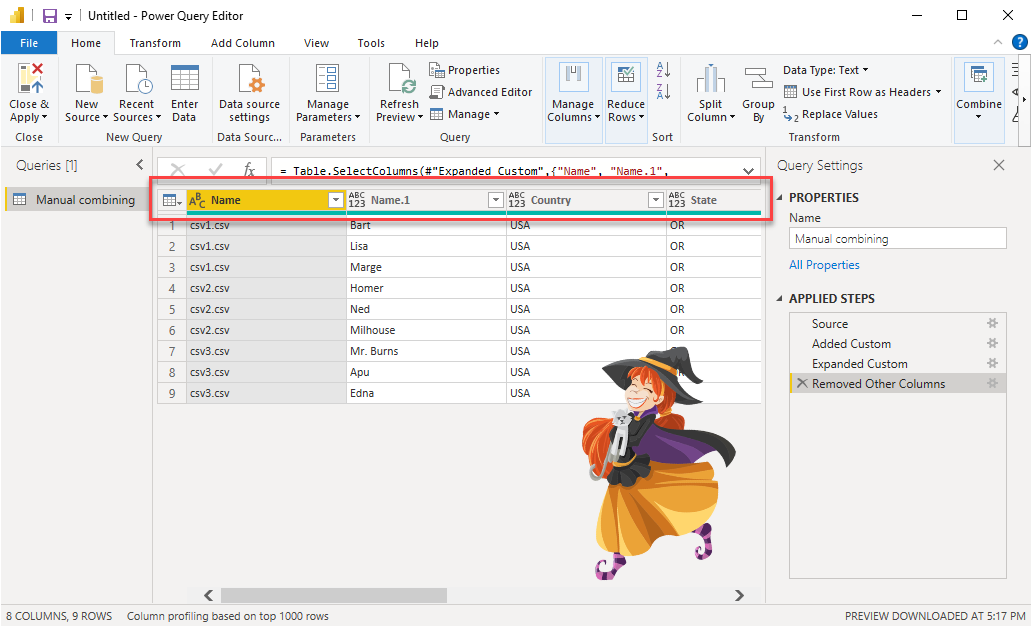
Now, of course we can promote the first row to headers, which will give us the proper column headers, but we will still have an extra row of column headers for each of the csvs (highlighted in the image above). There is an additional problem with that, which you may notice in the Name column. When we promote headers, that column will be renamed with whatever the name of the first file is. And then if you try to change that column name from “csv1.csv” to something else in a further step, you will run into trouble if for some reason the first file is no longer named “csv1.csv.” This is illustrated in the following image.

2. Click “Use First Row as Headers”
Ugh. Now we would have to filter out those rows that are column headers and also figure out how to handle the problem with the filename. Or… we could go back and tweak that one line of code we wrote to get the csv data from the binary content. To change it go to the APPLIED STEPS pane, delete the four steps after the “Added Custom” step by clicking on the X to the left of the step name, then click on the gear icon next to the “Added Custom” step to modify the formula. Instead of
= Csv.Document([Content])
we can change it to the following instead.
= Table.PromoteHeaders(Csv.Document([Content]))

After doing that, when we click in a Table cell and see the preview, we magically have proper column headers!

And when we expand the Custom column to get all the data, we see the right column names!

After clicking OK, our earlier problems of extra rows, missing column names, and having to promote something as a header that we don’t want all go away! Now all you need to do is clean up the data types and you’re all set. One query with just a couple of steps and your files are combined.
Don’t be afraid to tweak your M code just a tiny bit to solve some problems. All we had to do here was add a little extra something to one line of code, and we ended up with a nice clean and simple query to combine csv files.
Double, double toil and trouble;
Fire burn and caldron bubble.

[…] Stephanie Bruno shows us a method for combining CSV or Excel files: […]
LikeLiked by 1 person
Thanks for sharing. very cool tricks
LikeLiked by 2 people
I’ve always had the same feeling about those extra queries! Thanks a lot!
LikeLike
A really nice sharing and a very cool trick but I met a problem when trying it today.
The size of the query and the file will go dramatically big if one of the files has a great number of rows.
LikeLike
Another fantastic yet simple solution to a problem I’ve dealt with more times than I like to admit. Thank you!
LikeLike
Very nice. Elegant solution to a minor (but very irritating) problem.
LikeLike
Thank you for this article.
It is close to what I need, but I am stuck in using Excel.Workbook:I don’t get the column headers, but rather the Excel file contents:
Select all
Name
Data
Item
Kind
Hidden
maybe the syntax is incomplete.
Thank you
LikeLike
Hi Fernando – using Excel.Workbook you can remove name, item, kind, and hidden columns. You’ll then expand the Data column, which contains the contents of your Excel file. Hope this helps!
LikeLike
Thank you for this elegant solution!
For those who have CSV-files using a different delimiter from “,”: use:
Table.PromoteHeaders(Csv.Document([Content],[Delimiter=”;”])))
LikeLike
Omg you are a life saver! Thank you – been stuffing around with the dataflow for about an hour til I found this! just that extra step of promoting headers with the csv.doc step. phew!!
LikeLike
For folks who get Error for your rows after adding the Custom Column. You must define your csv.document. Only writing csv.document([Content]) will not work. You can try something like,
“Csv.Document([Content],[Delimiter=”,”, Columns=9, Encoding=1252, QuoteStyle=QuoteStyle.None])”
Change the columns number to however number of columns you have in each csv table.
LikeLike
Love this!
LikeLike