

There’s a lot of information on how to get around the lack of an out-of-the box CI/CD solution for Power BI datasets, but for me it’s often complicated and I have to read too many pages before making much progress on my own. This post is here to strip it down and provide you with the easiest way we know to enable a bonafide CI/CD process for Power BI datasets with Azure DevOps. The post is still longer than we’d like, but it includes detailed step-by-step instructions to walk you through every part of the process. To save space, we used slideshows for the screenshots, but you can pause them as you follow along.
CI/CD is short for “Continuous Integration/Continuous Delivery.” Continuous integration allows you and your team to seamlessly make changes to a dataset without stepping on each other’s toes while retaining the history of every change. Continuous Delivery ensures that those incremental changes are deployed automatically to a Power BI workspace.
This method provides you with a nice history of changes made to each element of the dataset and allows you to cherry-pick which changes are deployed, based on when you merge them to different branches. We find these two features to be huge advantages over the more simplified Power BI deployment pipelines, which don’t provide a change history and only deploy all or nothing.
What you’ll need
- Power BI Desktop
- Tabular Editor (2 or 3) (will refer to this as TE in the rest of the post). Make sure when you install it that you install for “Everybody” and not “Just me”, which allows it to appear as an External Tool in the Power BI desktop ribbon.
- An Azure subscription and access to resources
- An Azure DevOps project (will refer to this as ADO)
- Power BI Premium or Premium Per User (to use the XMLA endpoint)
- Git
- VS Code
High Level Overview
Initial Configuration
The high-level overview of the steps to configure the process are below. There are a bunch of little details you’ll need as well for the initial configuration, but we’ll get into those later in the detailed steps.
- Download the sample yaml files from https://github.com/stephbruno/Power-BI-Dataset-CICD
- Create (or use an existing) Azure DevOps project. If you’re creating a new project, you’ll need to do a bit more set-up, but we will go through that.
- Determine the method of security you’ll use to publish the model to a Power BI workspace. We used a service principal and an Azure key vault.
- Set up a repo (repository) and initial project folders for the dataset(s) and the CI/CD pipelines. You can do this locally and then push to your repo with VS Code or the command line.
- Save the downloaded yaml files from above to a folder in your repo. Edit the downloaded .yml and .cs scripts for your configuration. This is easier than it sounds. If I read this post before doing it, I might stop right here. But please don’t – I promise it’s not bad.
- Create the ADO pipeline
- Test and tweak until it works
Dataset Editing
The high-level overview of the steps to edit a dataset after the process is configured is:
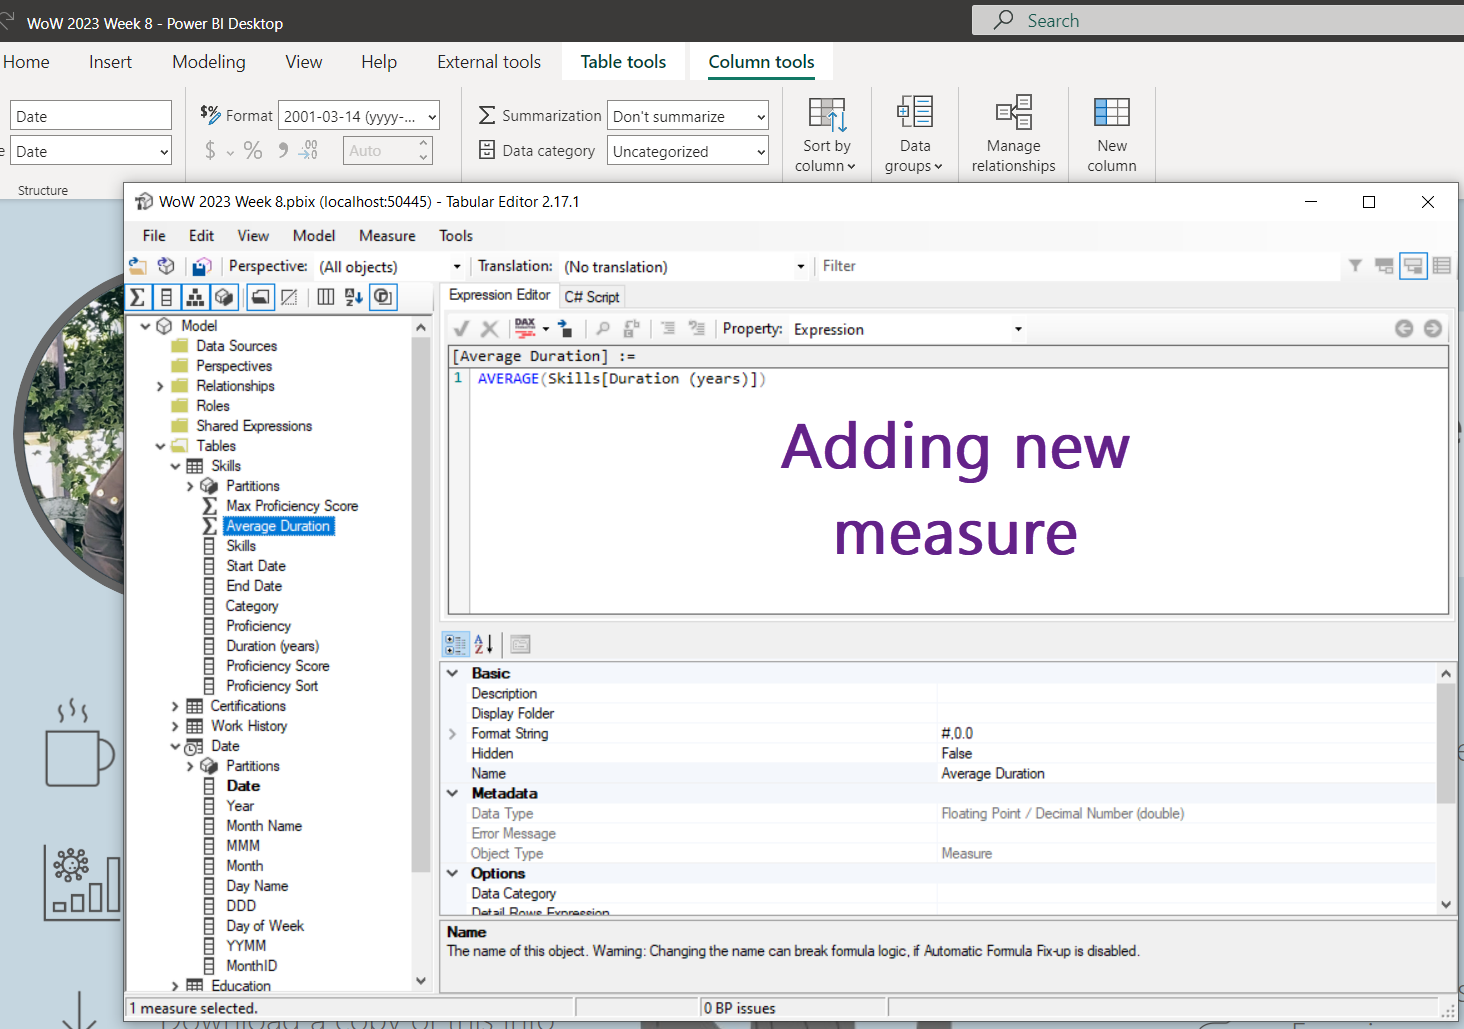
- Use Tabular Editor to save the data model as files in a folder in your cloned repo. You can do this from the External Tools in Power BI Desktop, or edit directly with TE (remember that editing with TE disconnected from Power BI Desktop is a one-way street, though). This allows for easy tracking of the history of changes to each element of the data model. If you track only the .bim file, it’s much harder to see the history of a specific measure or relationships, for example.
- Use your preferred tool (I like VS Code or the command line) to create a pull request to merge the dataset changes into the files in the test or prod branch (depending on your configuration).
- The ADO pipeline is automatically triggered when the changes are merged, which then runs any necessary scripts on the dataset (the sample script updates parameters) and then publishes to the designated Power BI workspace.
That’s it🥳! This allows your team to make changes to a dataset and automatically deploy selected changes to the Power BI workspace, in just the few clicks it takes to save the model to a folder and do a pull request (PR).
Detailed Steps
Continuous Integration (CI)
- Get all the files locally from the sample repo. You will need these in your own repo (which you will create in subsequent steps). You are going to customize these files later, but for now just download them locally.
- Azure DevOps – you either need to use an existing project or create a new one from scratch.
- Create an organization if necessary, and a new project if necessary.
- You may need to submit a request for parallel jobs so that you can run the pipelines if you’re starting from scratch.
- You can put in a request here, but it takes a couple of days to get approved: https://aka.ms/azpipelines-parallelism-request
- If you’re making a new project, you will be prompted to create and clone contents of the repo.
- Create an organization if necessary, and a new project if necessary.
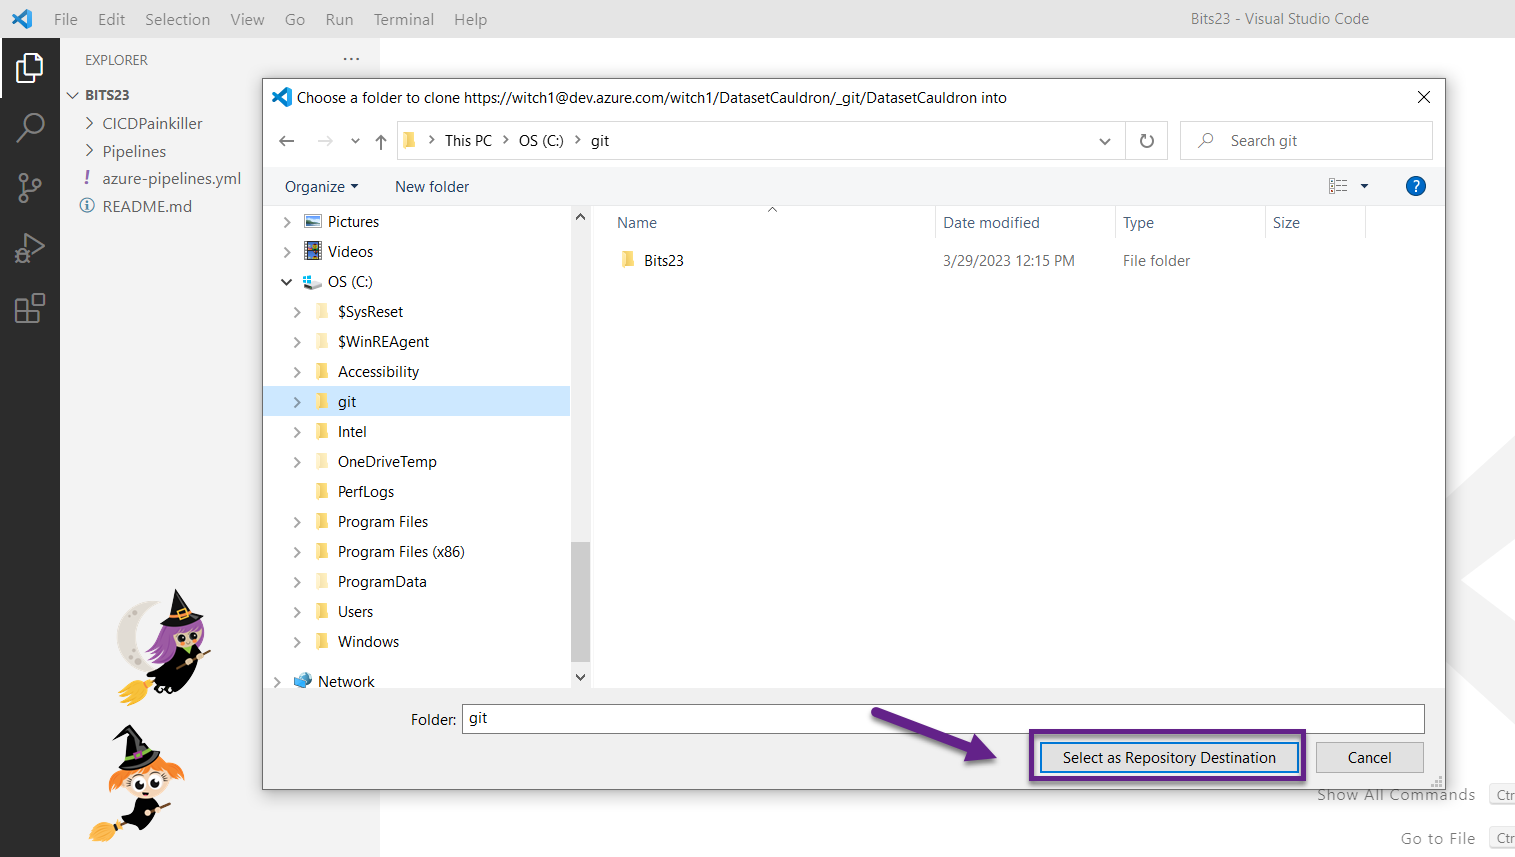
- Clone the repo from your project. There are a lot of different ways to do this, but we prefer to use VS Code. This allows us to stage and commit changes to the files in the repo using Git. If you’re using VS Code for the first time, you’ll need to authenticate and configure a few user settings (it’s just running a couple lines of code in the command line – no biggie).
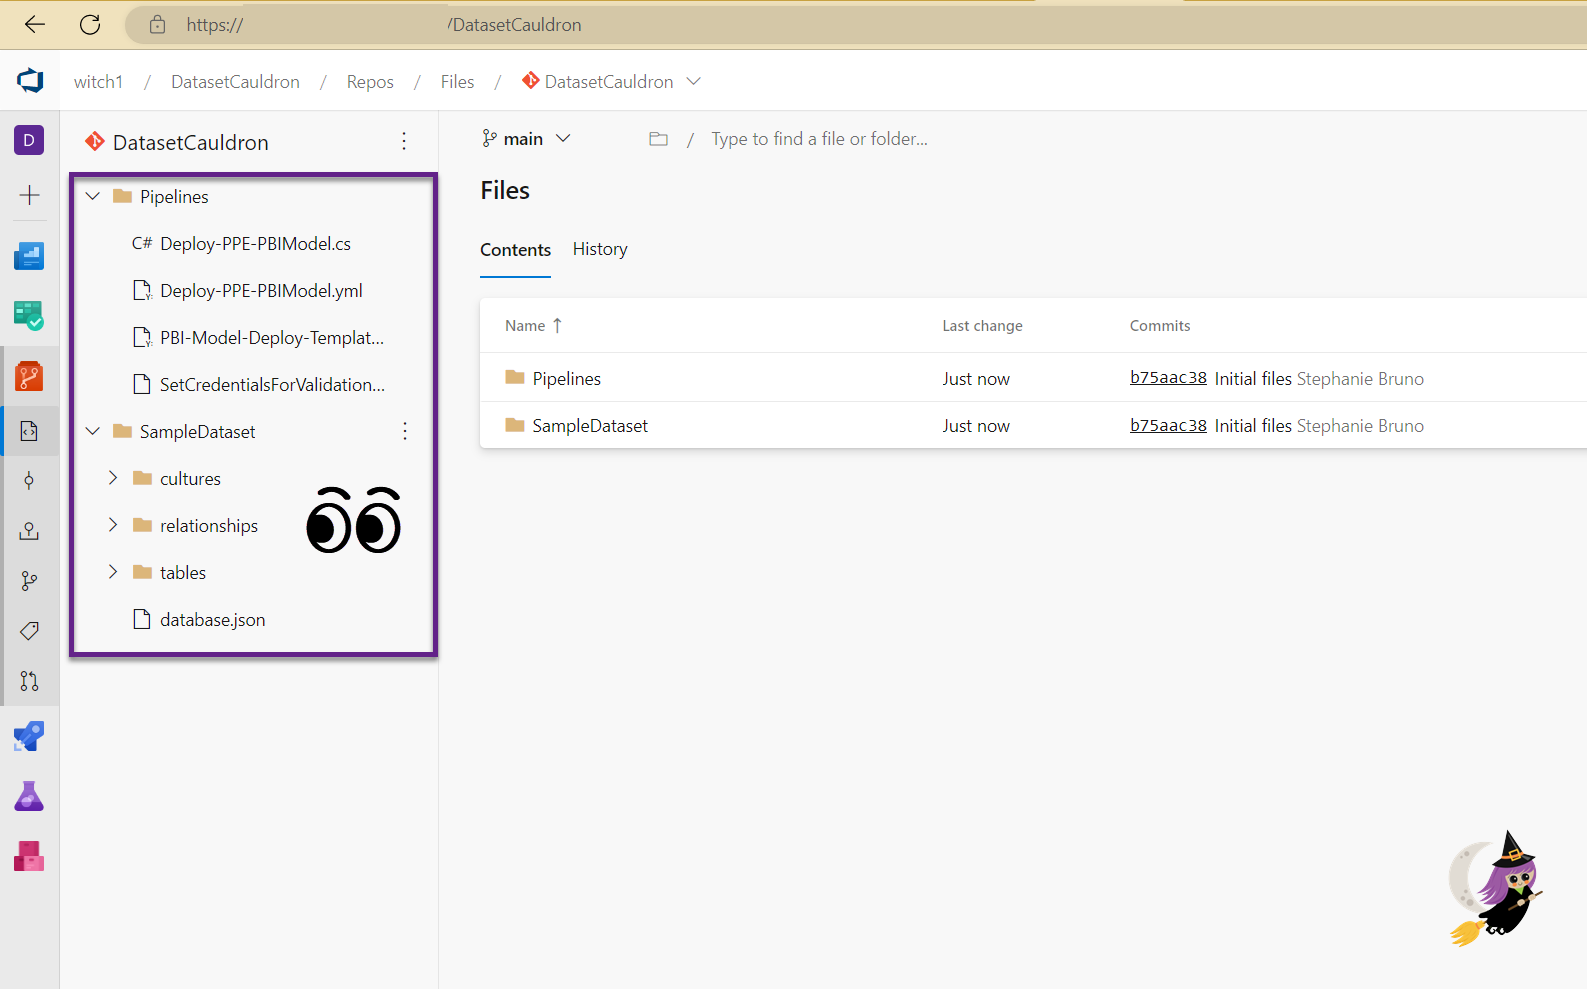
- Once you’ve cloned your new shiny repo, you will have an empty local folder (there may be a README.md file there and some hidden git files). Our repo is called “DatasetCauldron” in the five images below.
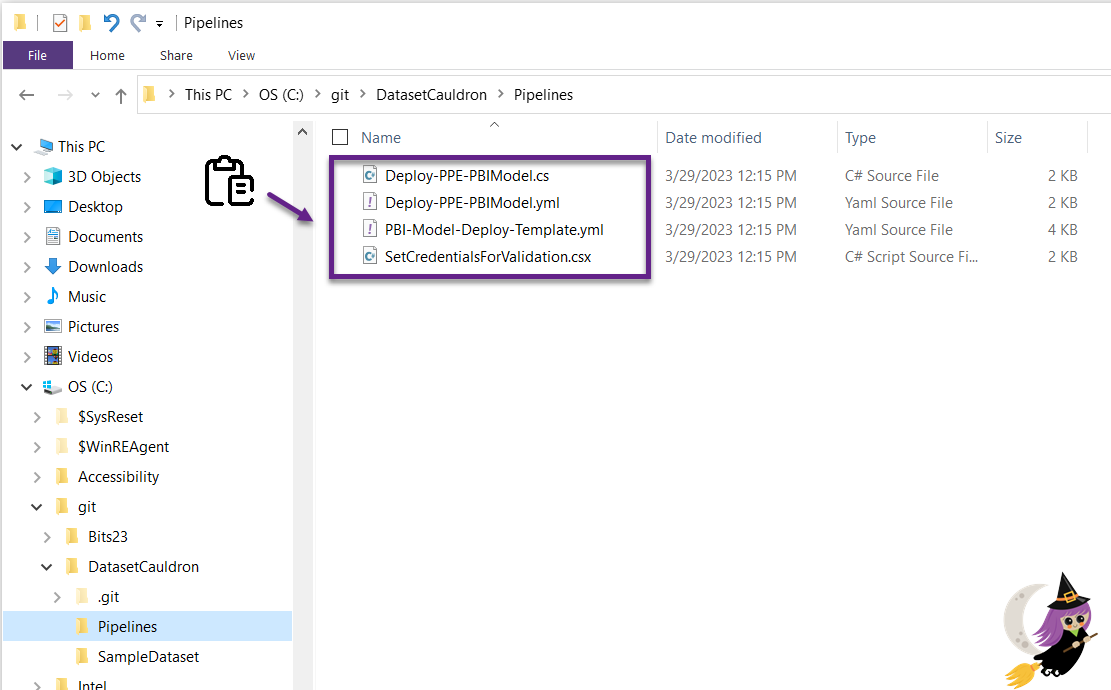
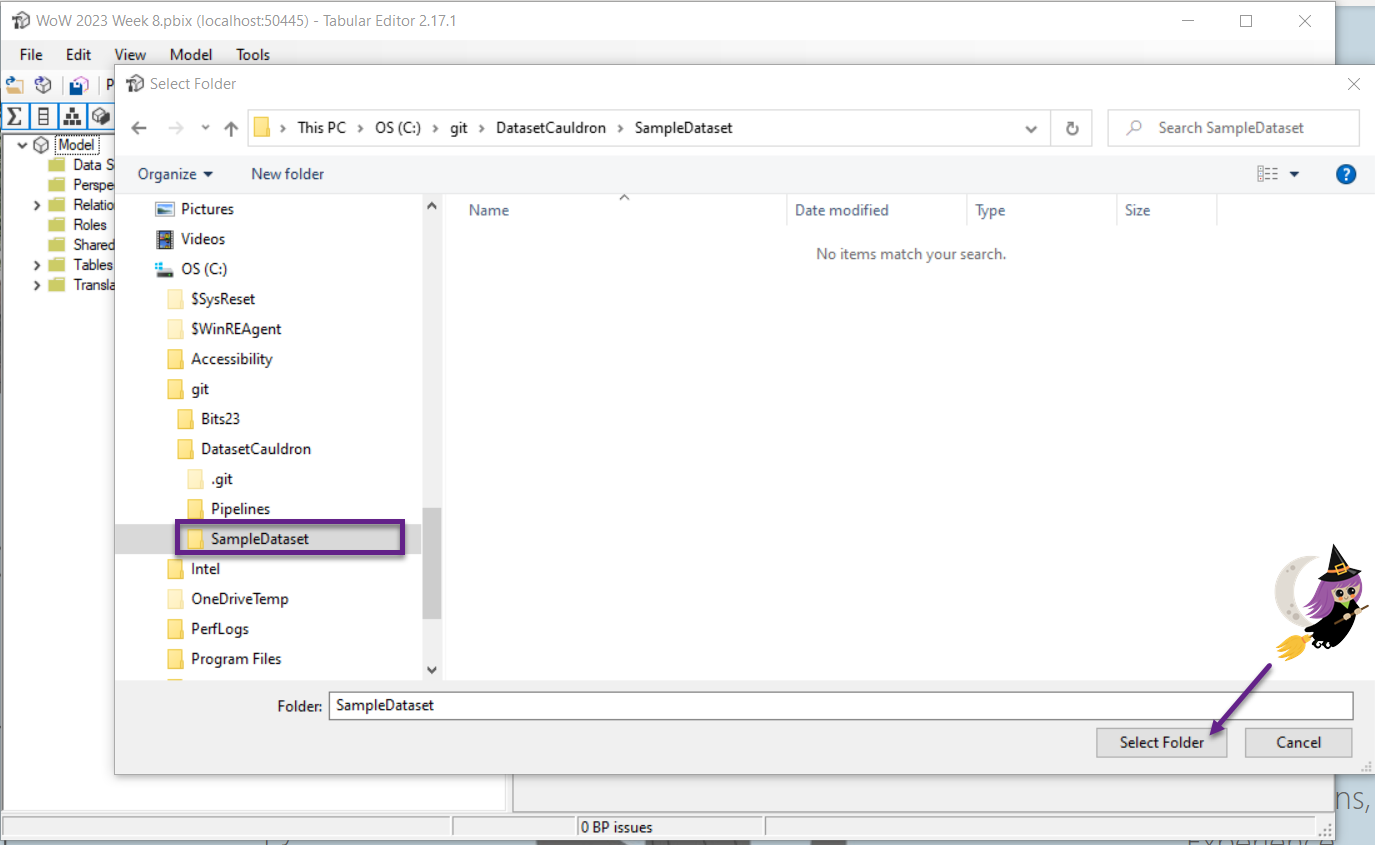
- In your new repo, create one folder for the CI/CD pipeline files. Call it something like “Pipelines” or “CICD” to distinguish it from your datasets. Create another folder for your first dataset (we called ours “SampleDataset”).
- Copy the downloaded sample files (two .yml files, the .cs file, and the .csx file) into your new “Pipelines” or “CICD” folder that you created in the previous step. We will go back and edit them later.
- Open up a .pbix file. This will be a file that has a dataset that you want to build the CI/CD solution for.
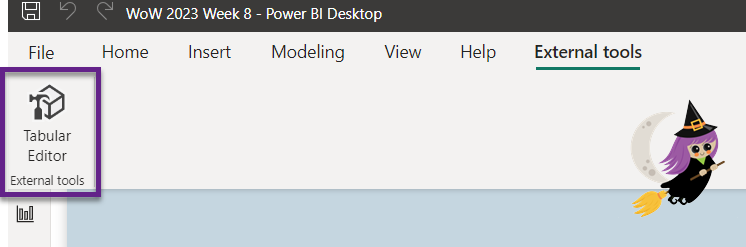
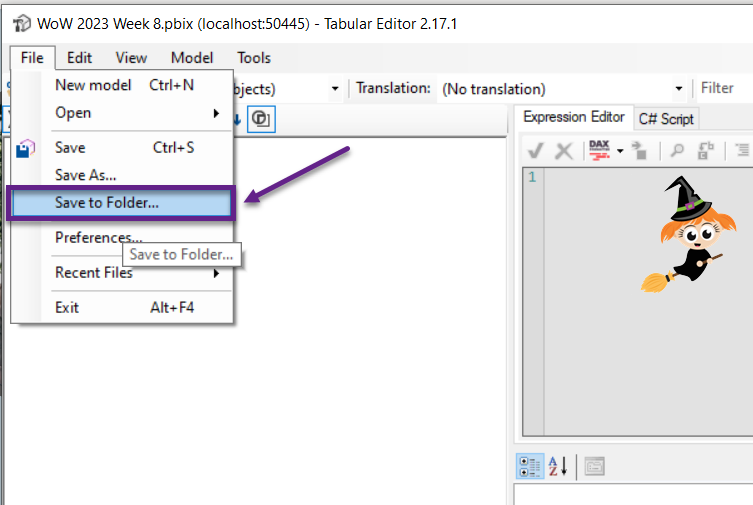
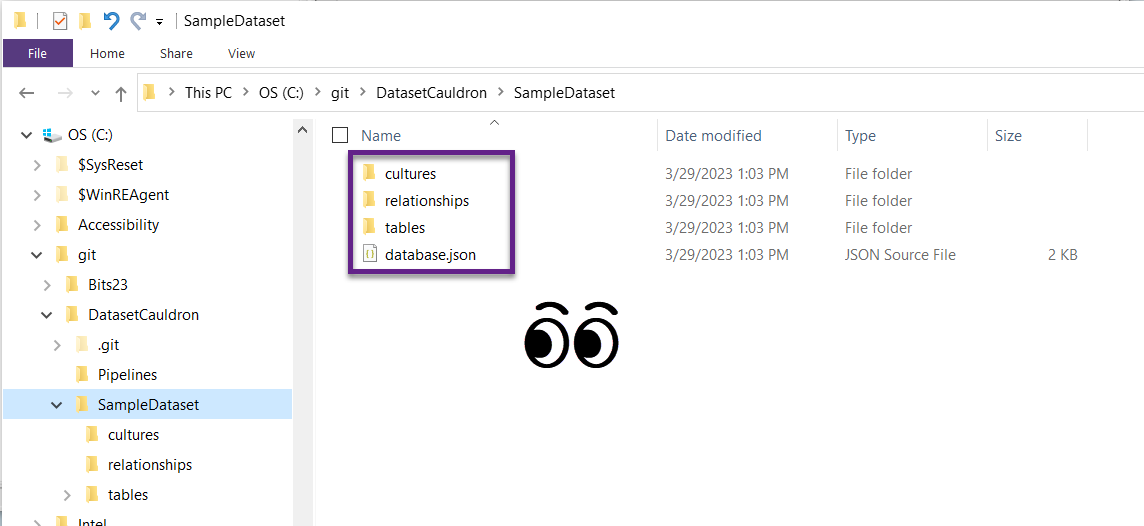
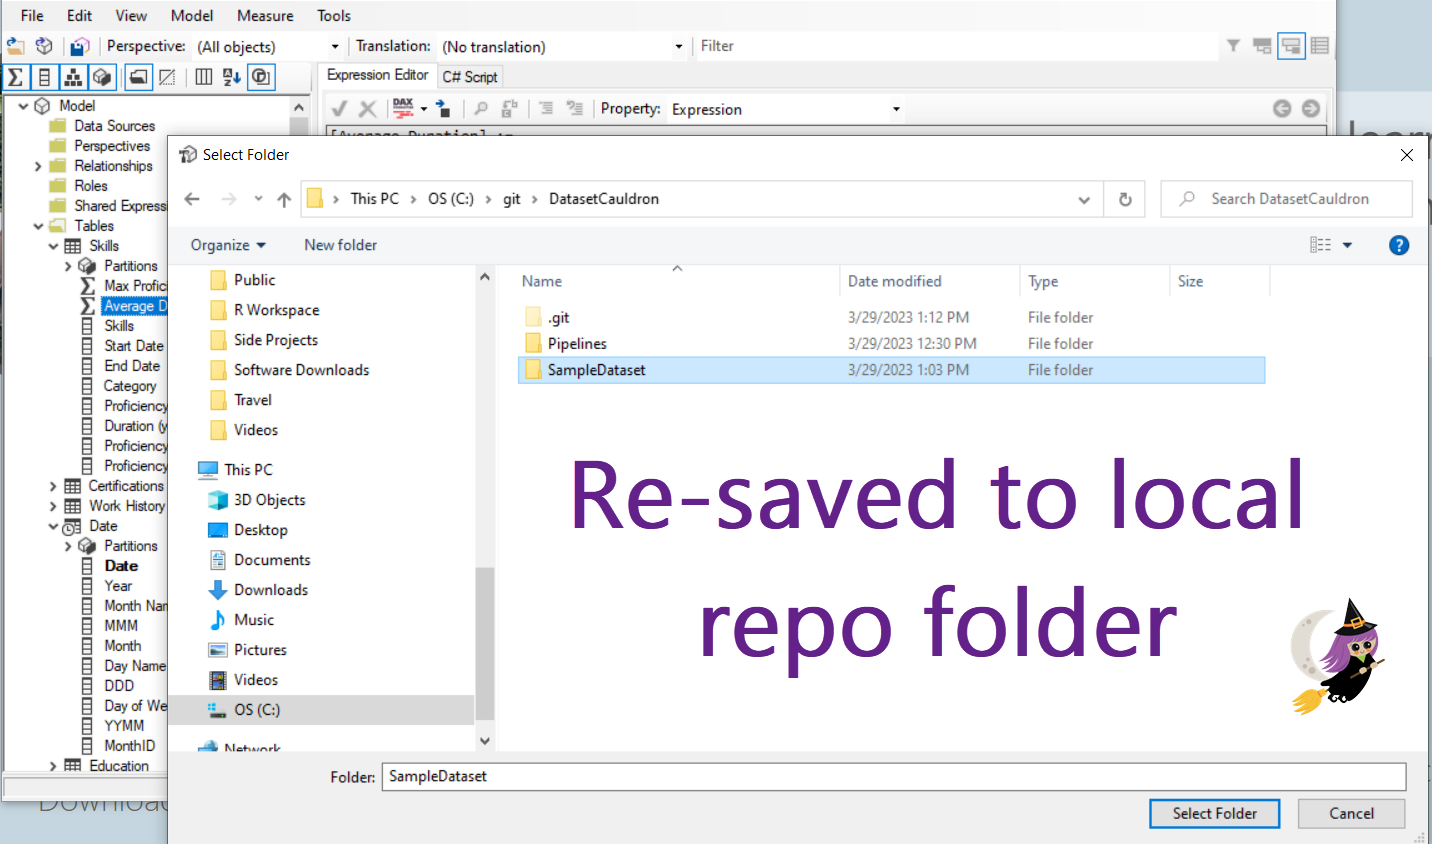
- Use Power BI desktop, if that’s what you normally use. From the External tools tab in the Power BI desktop ribbon, open Tabular Editor. Select File – Save to Folder… and choose the SampleDataset folder that you created in your synced repo (in Step 4). This will break down the file into a json file for every object in the dataset.
- The reason this is magical is that it allows you to track the history of every individual object separately. It’s truly beautiful. This has nothing to do with saving the data anywhere – it is just metadata. It’s also separate from the .pbix file, but contains all the info needed for the dataset. You’ll see folders called things like “tables” and “relationships” among a few others in there. Now you can close TE or leave it open.
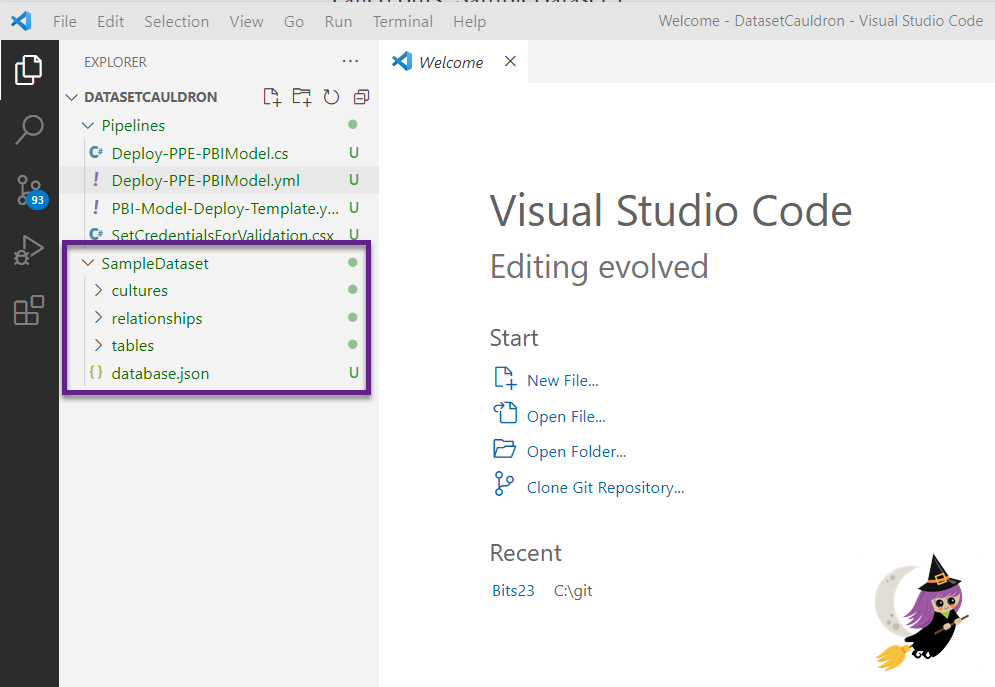
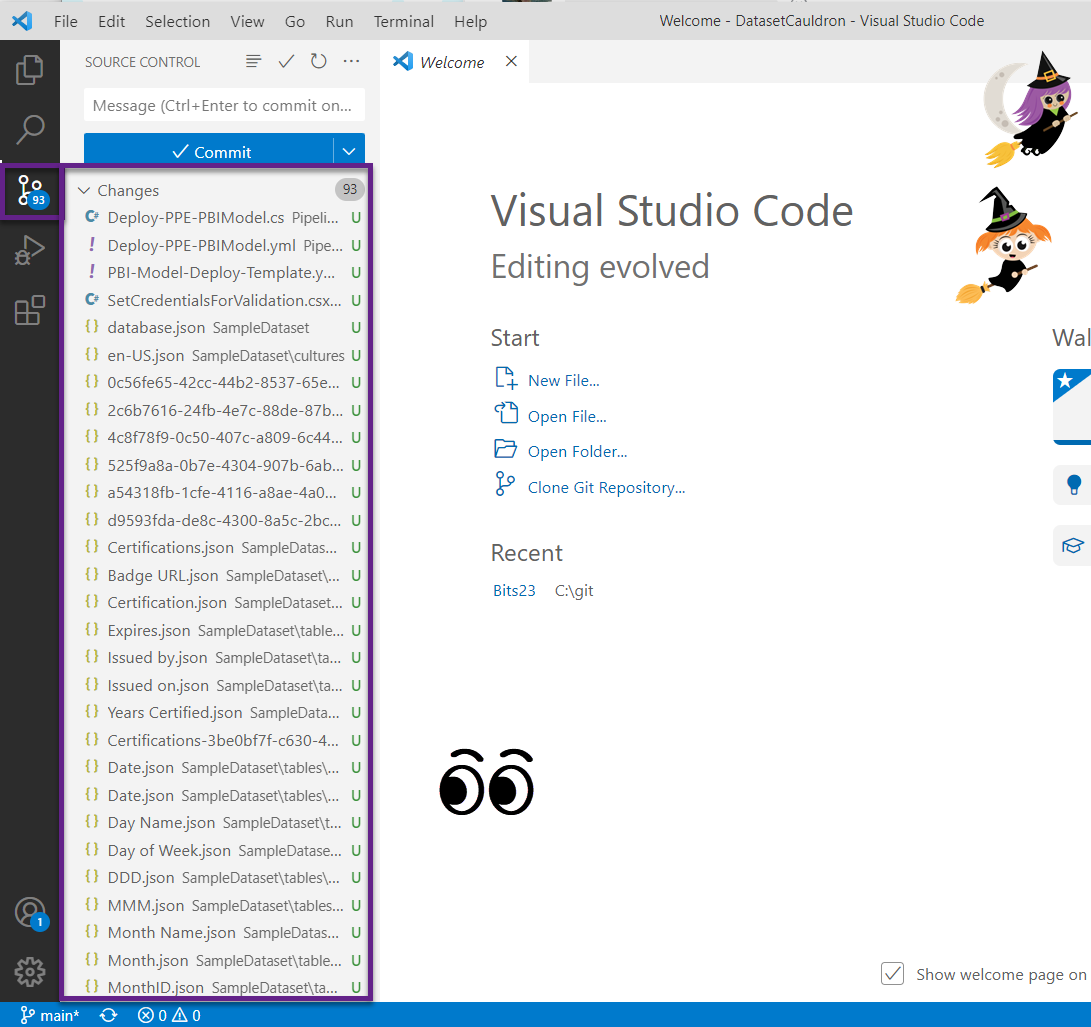
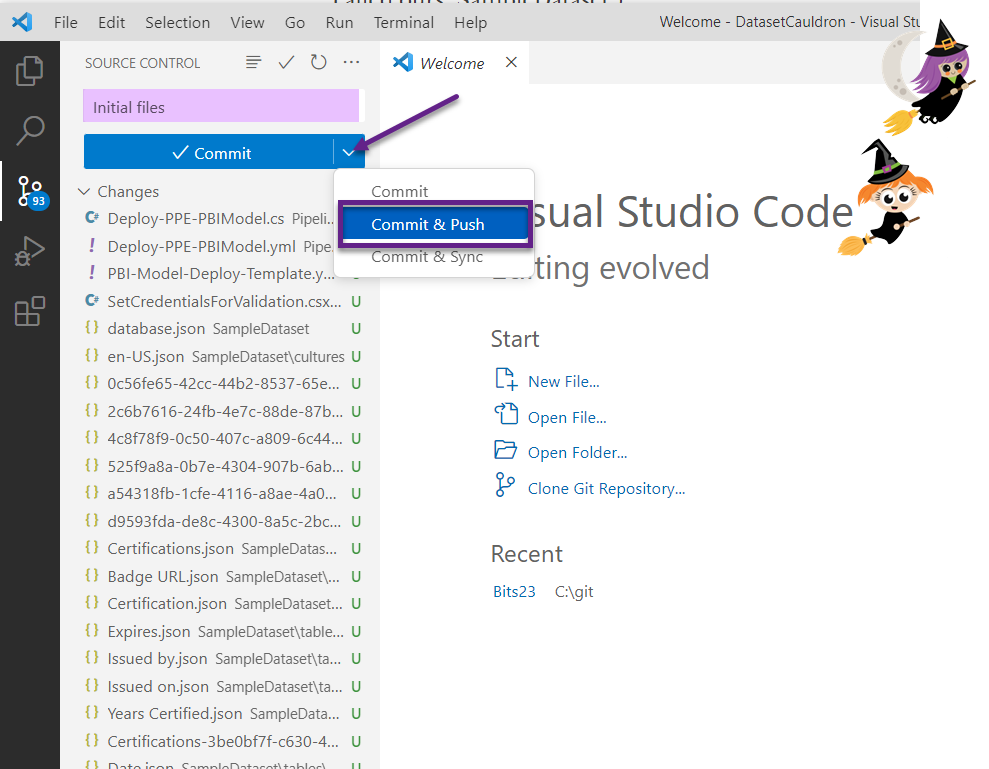
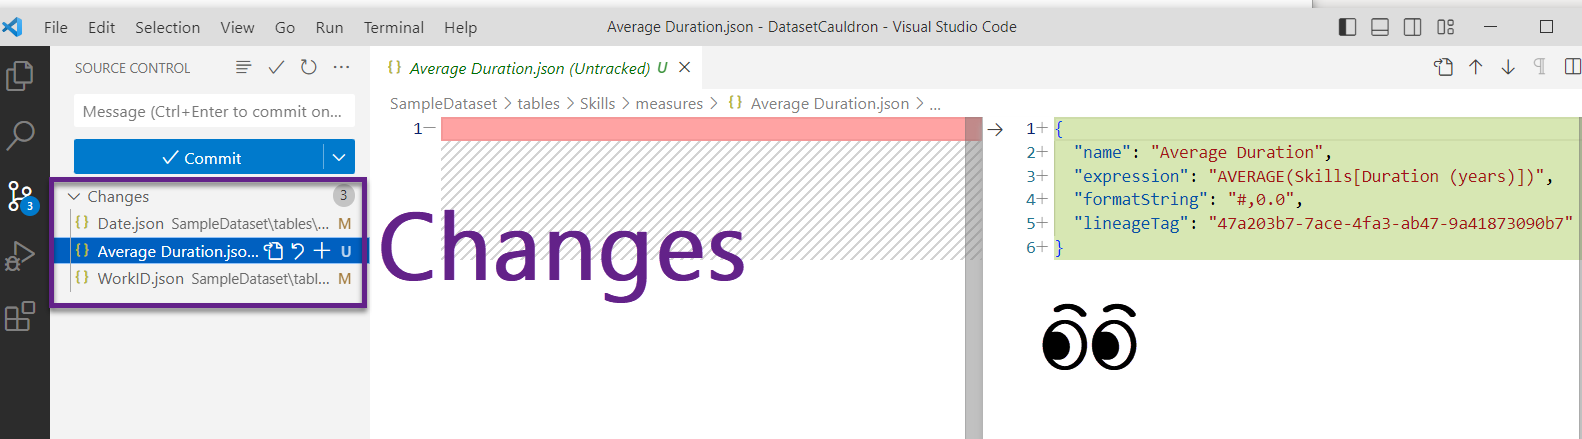
- Go back to VS Code and ensure your changes are reflected on the source control tab. You should see a whole bunch of pending changes that include all of those files you just added.
- Add a Commit message, and click the down arrow next to the big Commit button and select “Commit & Push.” If it asks you if you want to stage your changes, click yes.
- Note that in this case we did not create a new branch, but just pushed to the main branch. You may have other policies in place that require a separate branch. Either way, you’ll need to get your new files into your main branch, either like we did or with a pull request and merge.
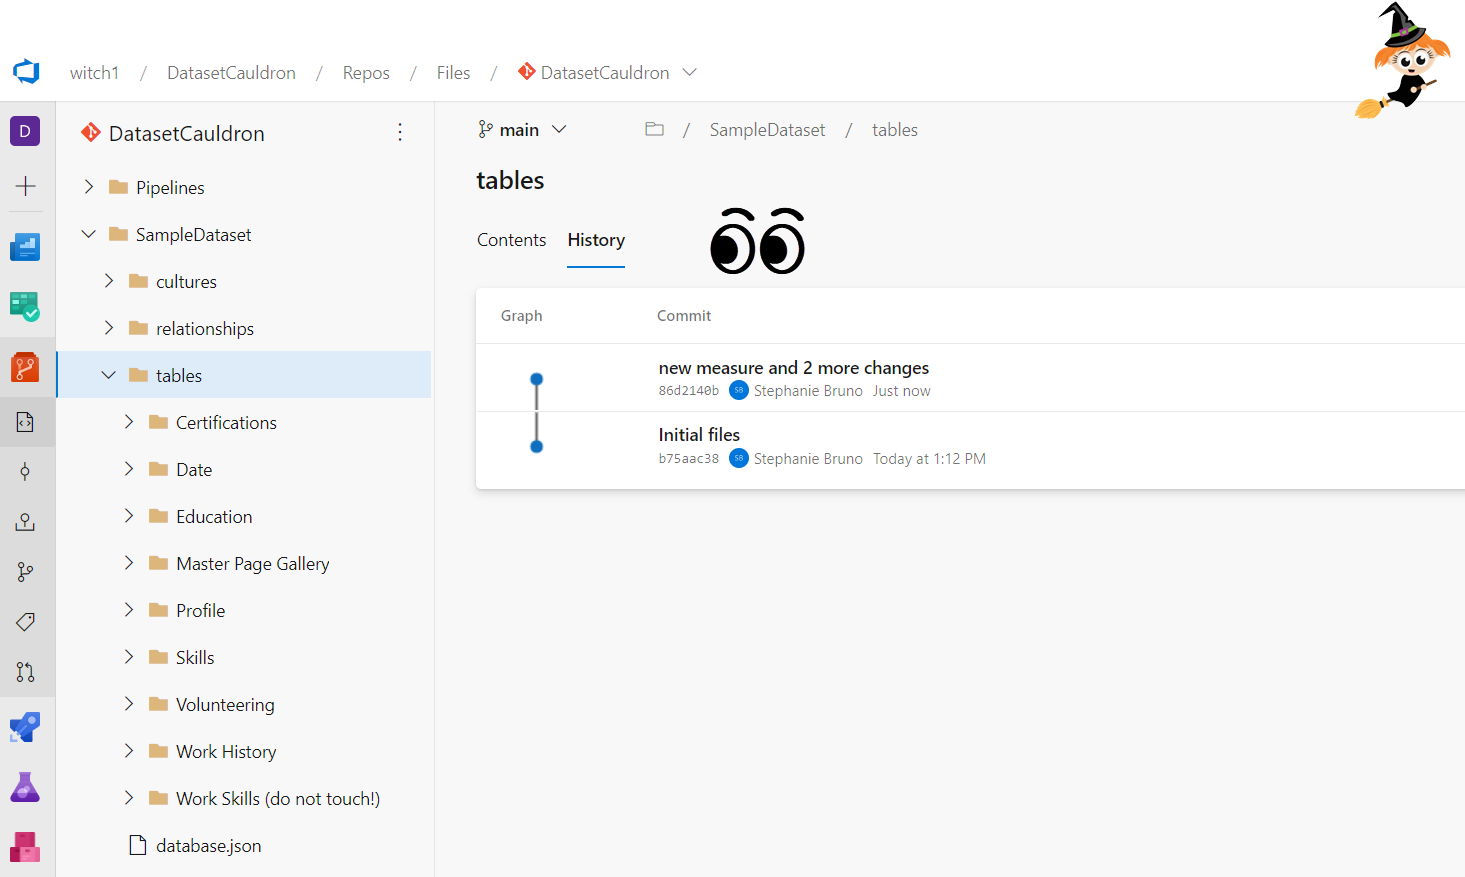
- Go back to your ADO repo and visually confirm that all of the new files are in the “Pipelines” folder and the “SampleDataset” folder.
- Way to go! You have now done part 1, which is CI.
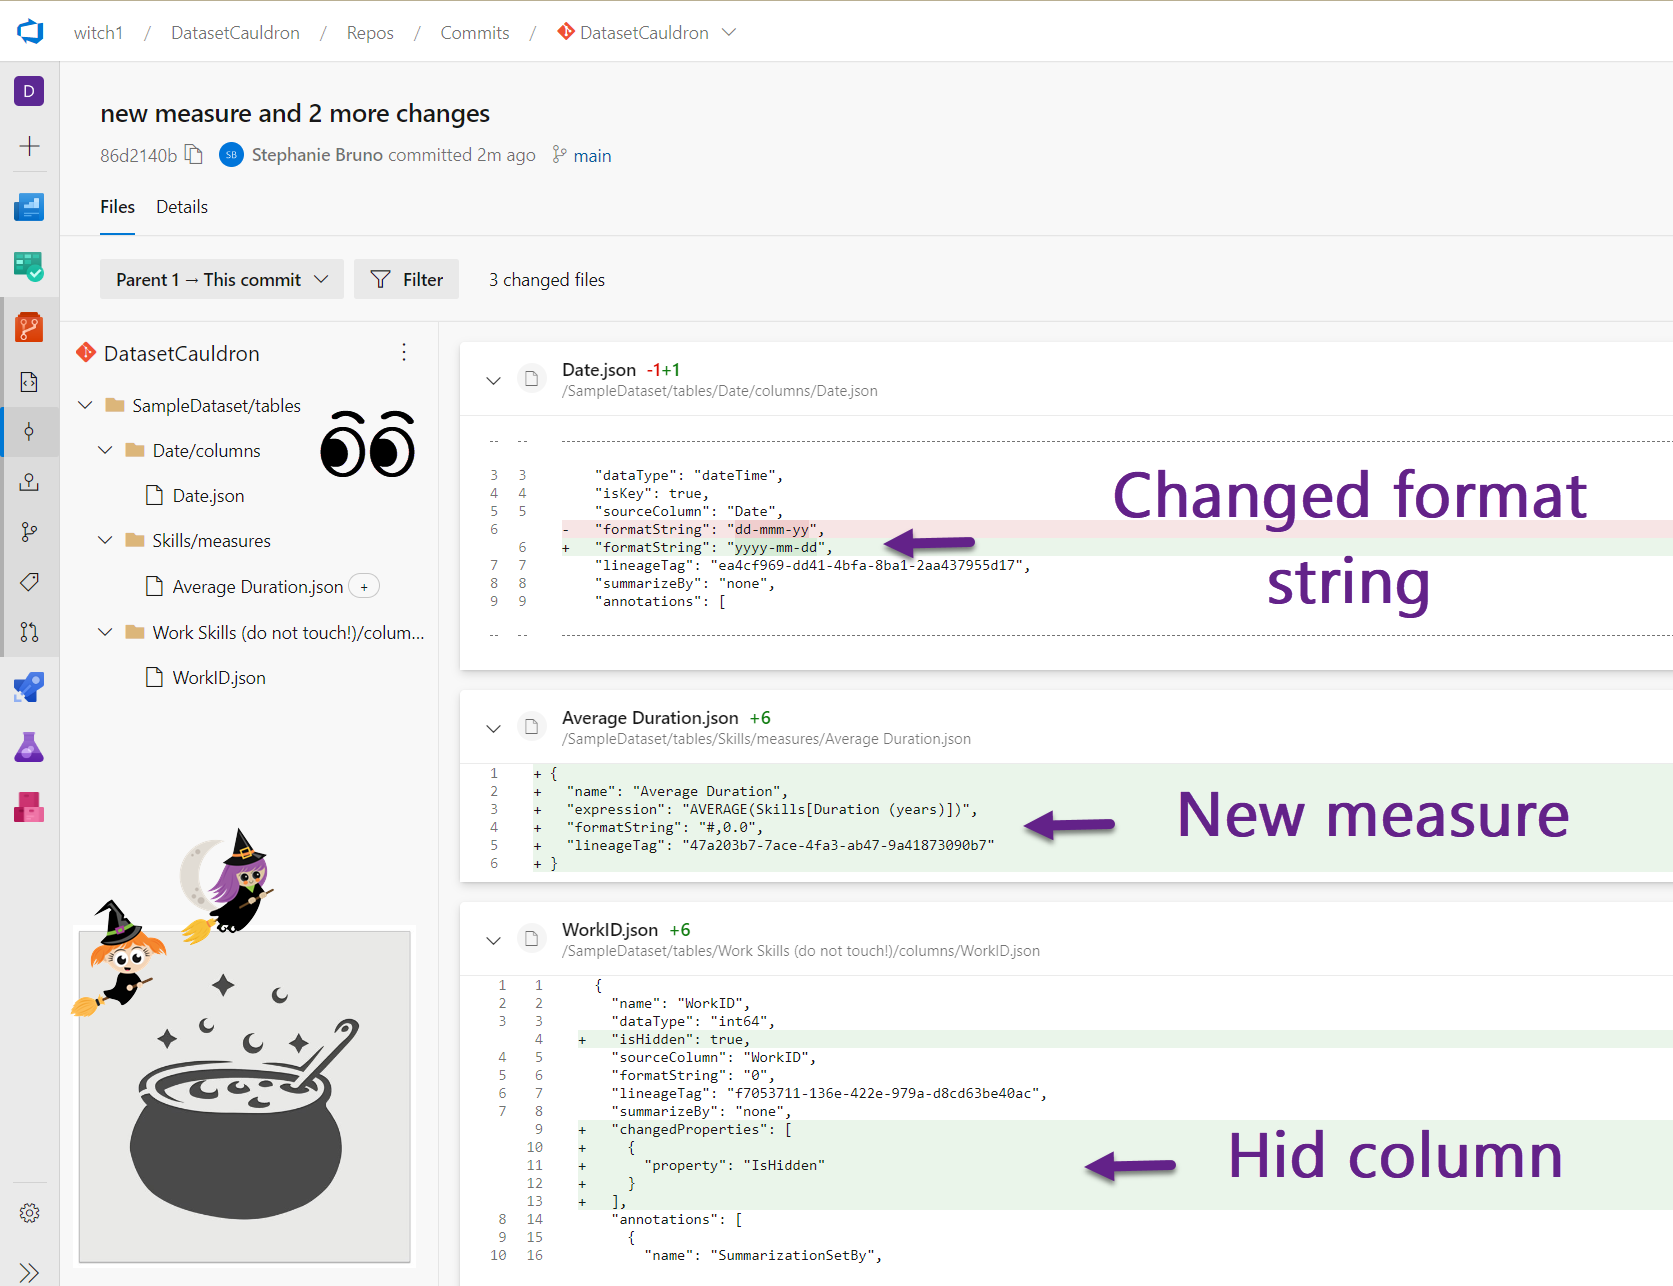
- You are enabling continuous integration of your data model!! In the future, you can continue to use TE to save the model to folders, and VS Code to push the changes to ADO. Wow! You now have a history of the changes to your data model! Make some more changes and pull requests to see this history – go wild with it! In fact, do this a few times if you feel like seeing the changes! You can see some sample changes and how to track them in the five images below. CI is DUN! Next up…. CD!!!
Continuous Delivery (CD)
Now for the more tedious (but luckily one-time) part to enable CD. It’s time to configure the details of the pipelines that will allow you to publish the data model to a workspace. Let’s start with the easy one. You can do the yaml and cs edits either in VS Code and do more pull requests to merge them to the main branch, or you can simply use the browser and edit directly in ADO.
- Service Principal and Secret: Ensure you have access to an Azure Key Vault, and have created a service principal with access to the Power BI workspace you will be deploying to. Create a secret for the Service Principal, and put the value in the key vault as a new secret.
- Create a Service Connection in the ADO project that can access the key vault.
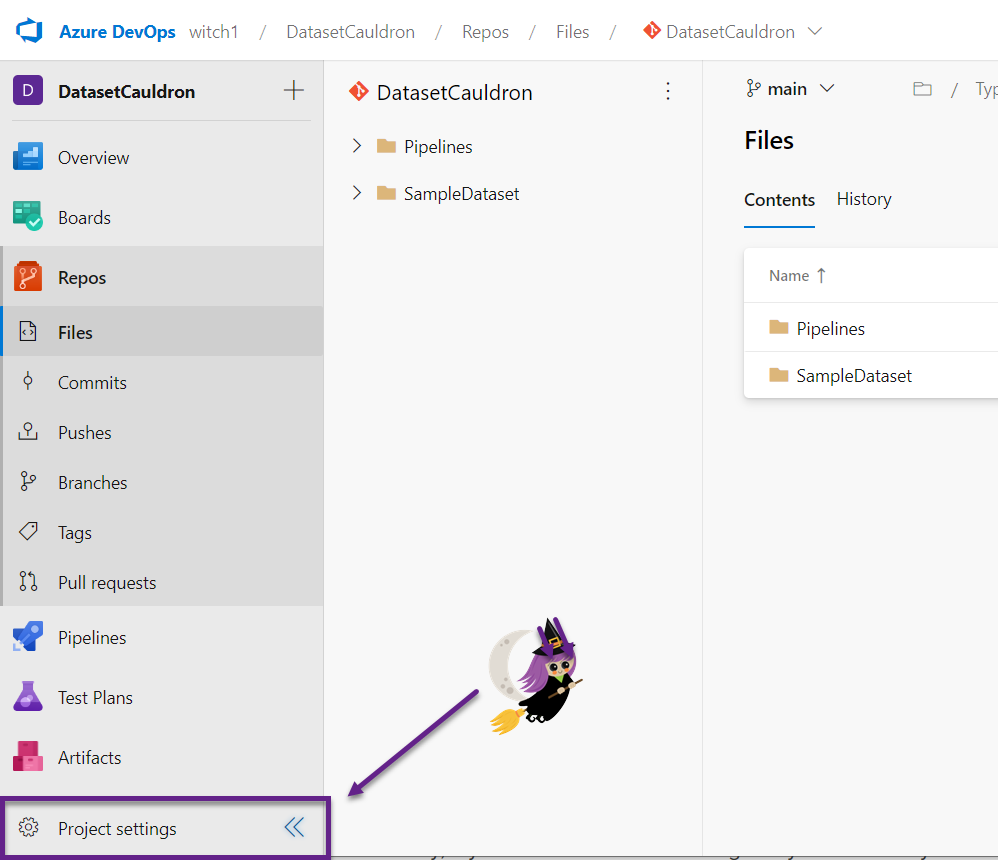
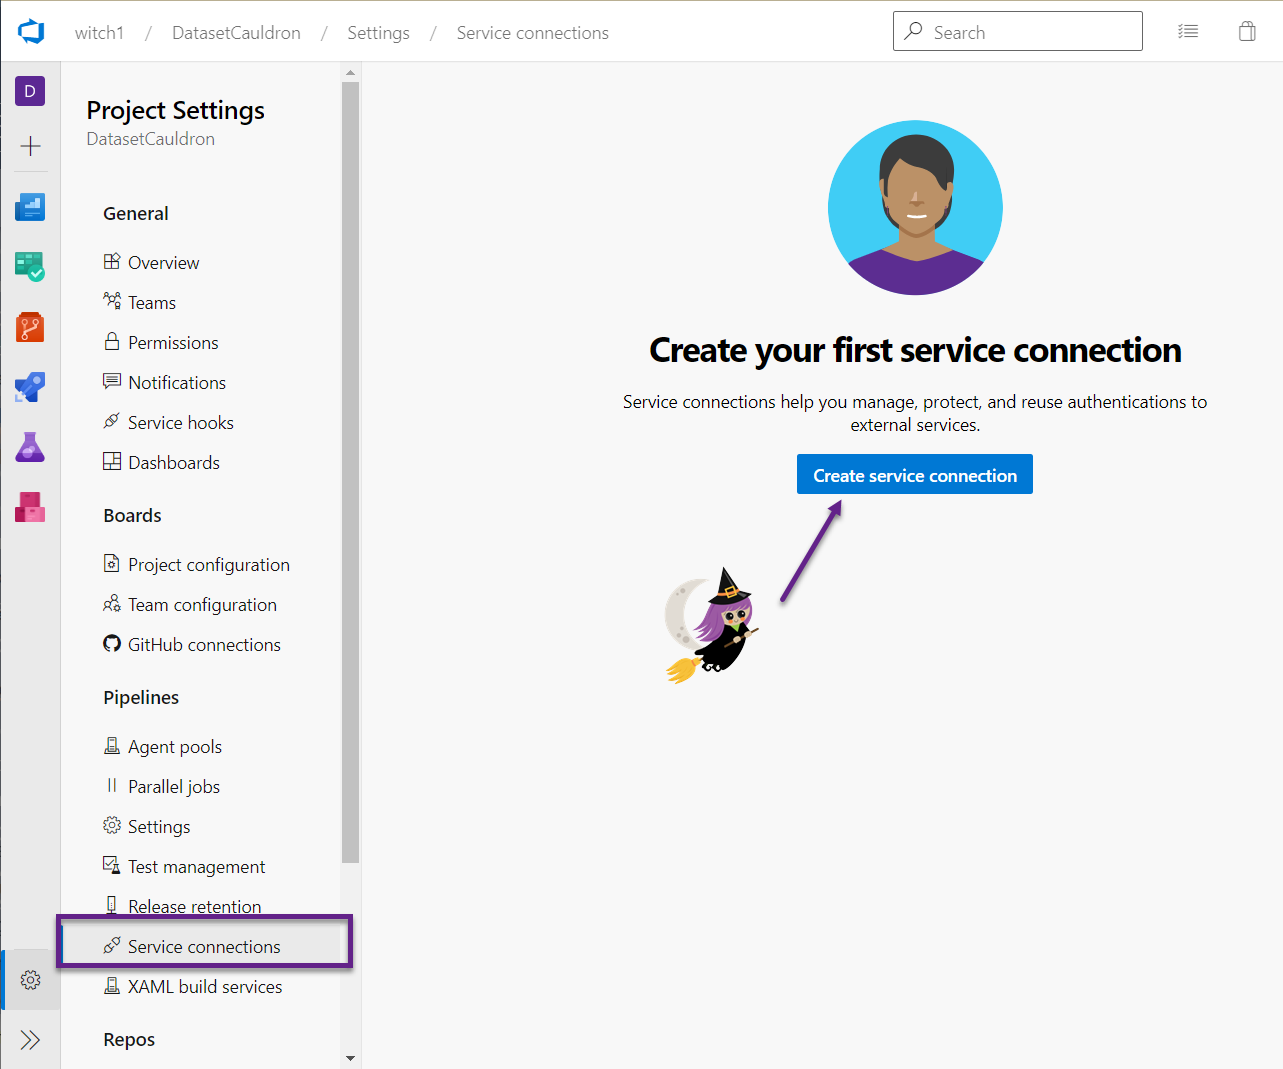
- In ADO, click on the Project Settings. Under Pipelines, go to Service connections, and click the button to Create a service connection.
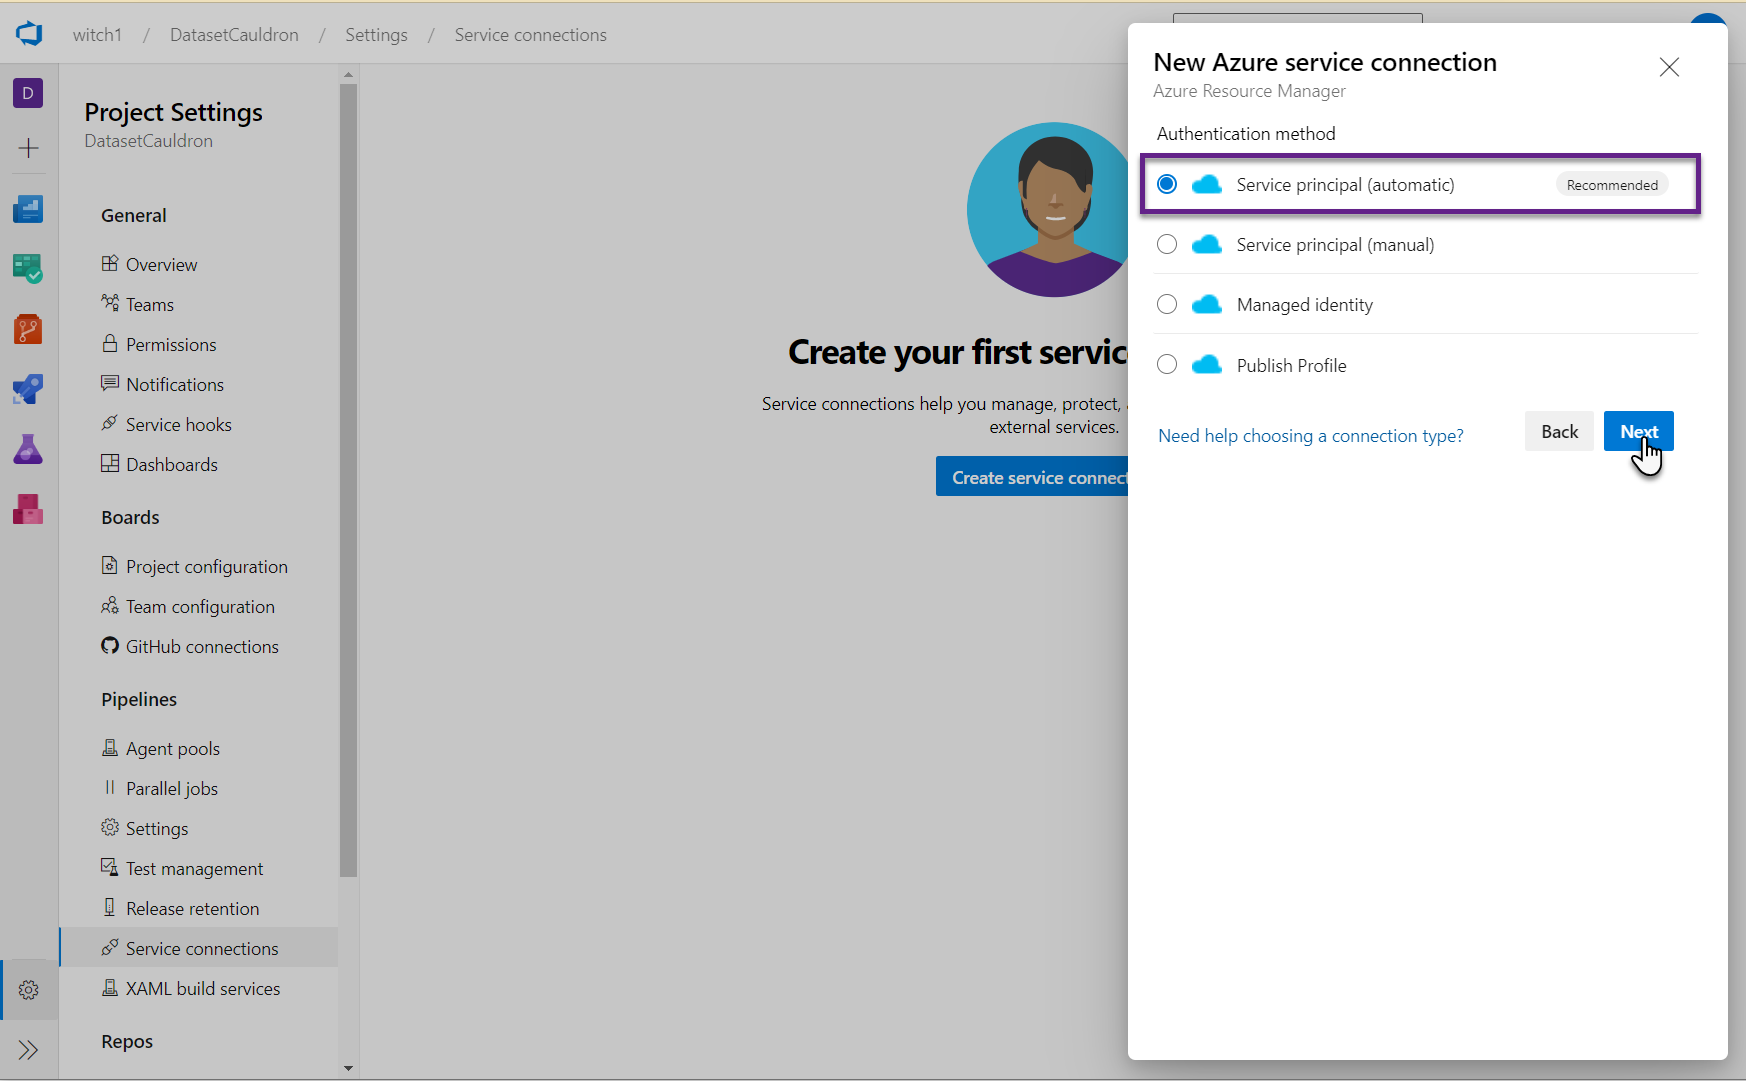
- Select “Azure Resource Manager”. Accept the default of “Service principal (automatic)” and click Next.
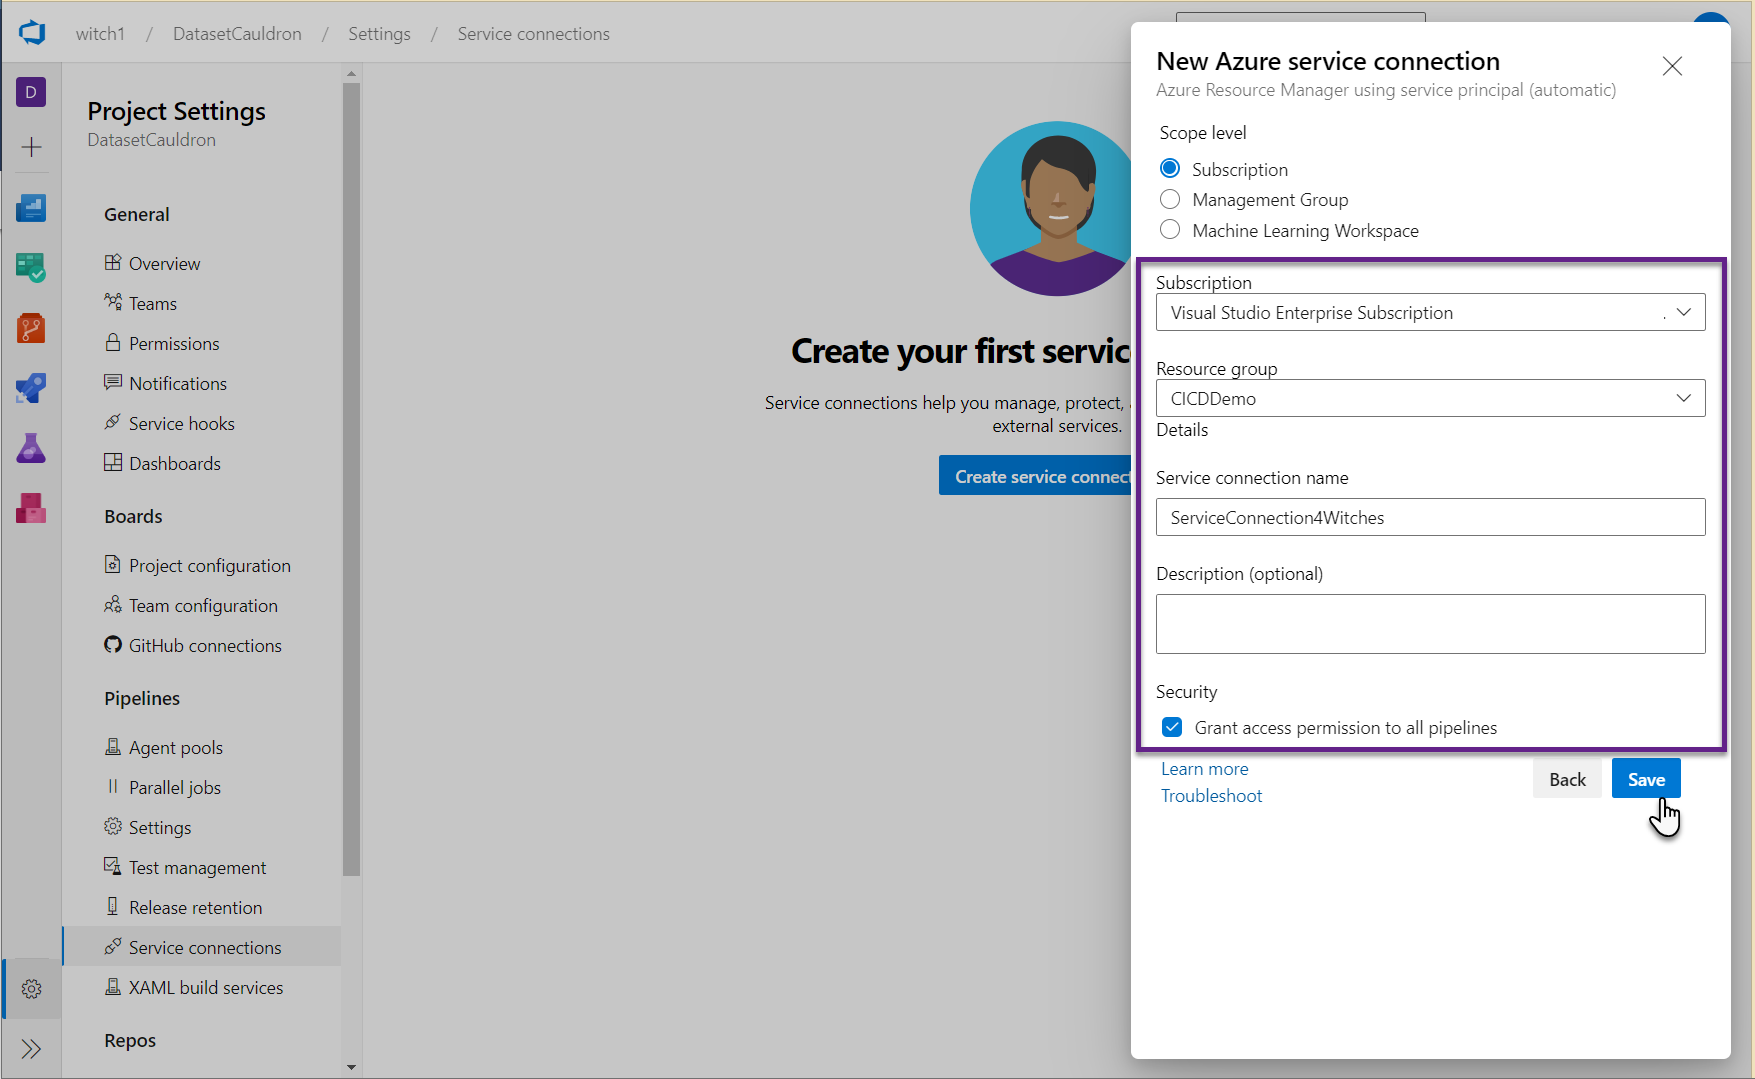
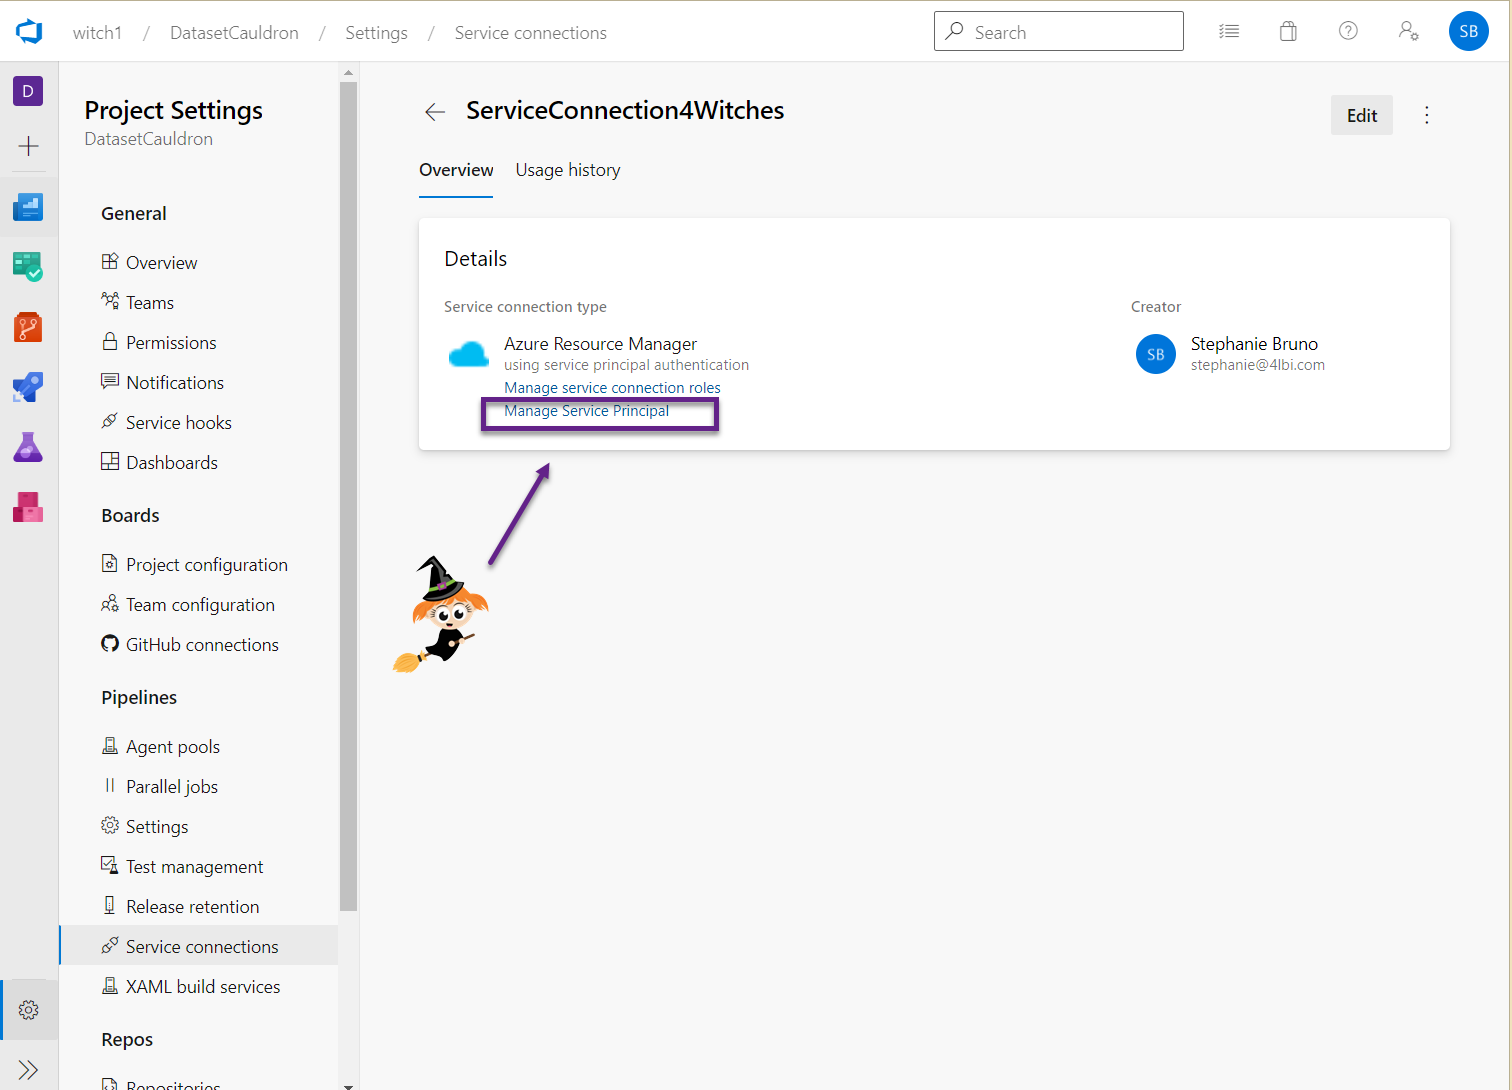
- Select the values in the dropdowns that correspond to your Subscription and Resource group where your key vault is. Name the Service connection and grant access permission to all pipelines. Click Save. You can go back here anytime and find the details (like the application id, etc.) by clicking on “Manage service principal” in the Service Connection.


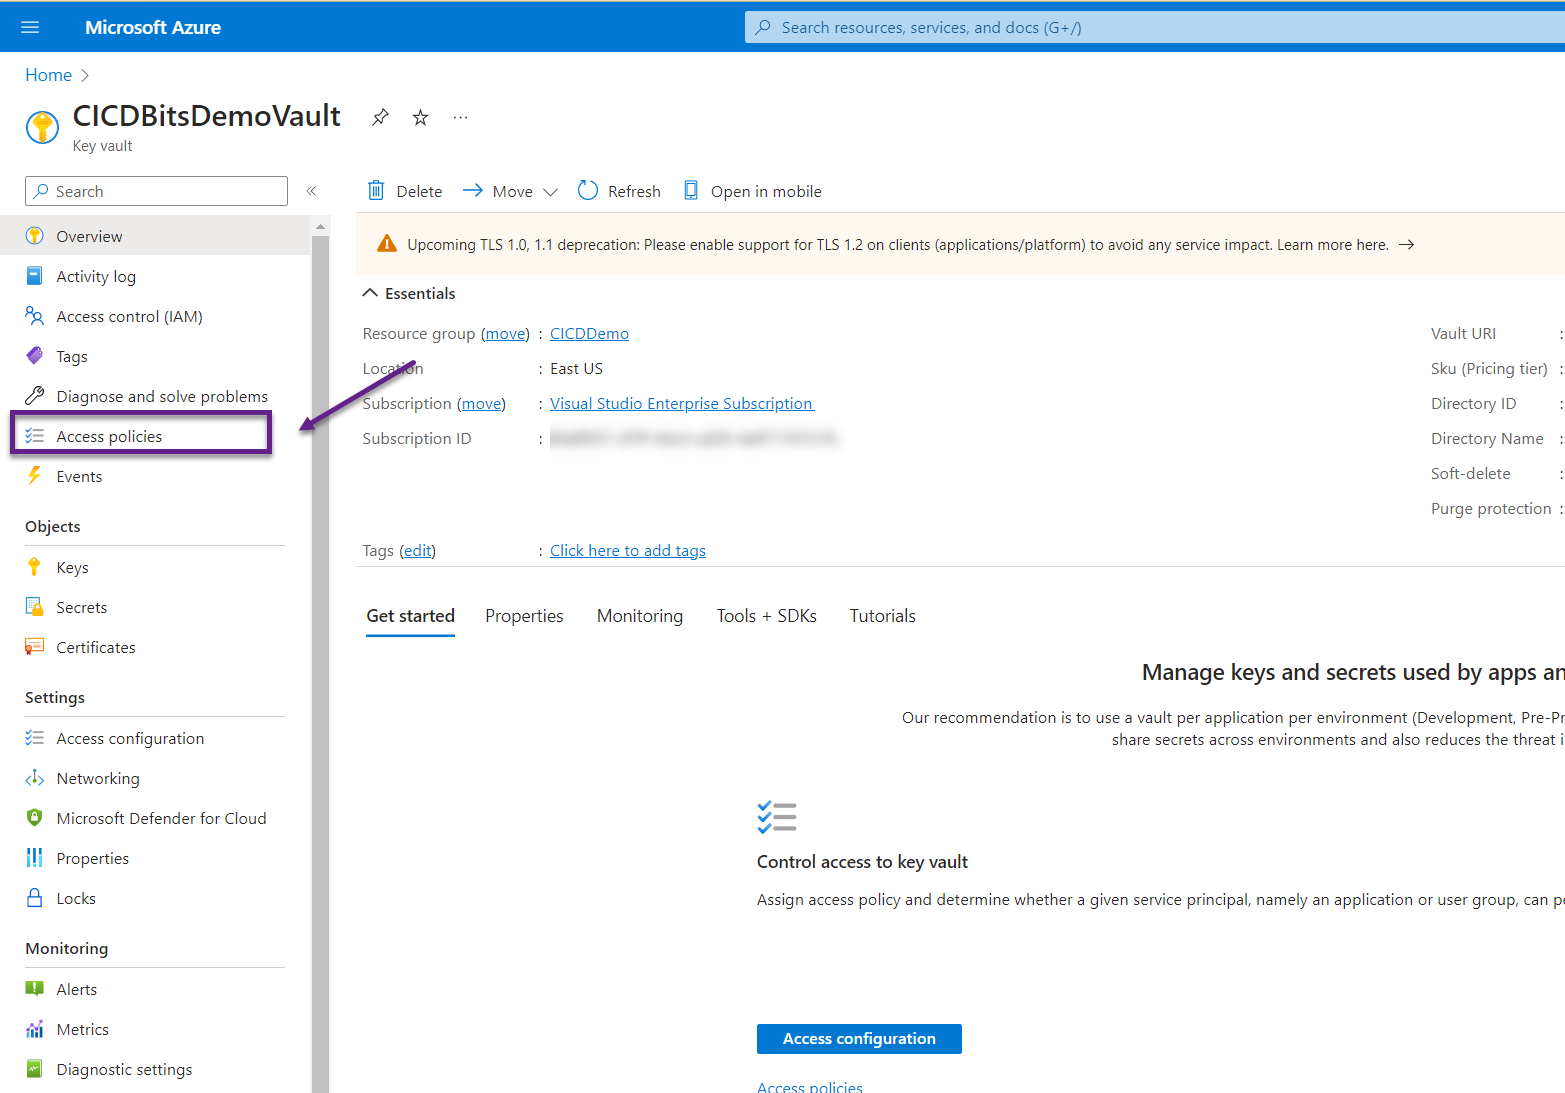
- Give your new service connection permissions to the key vault.
- In the Azure Portal, navigate to the key vault and click on Access Policies.
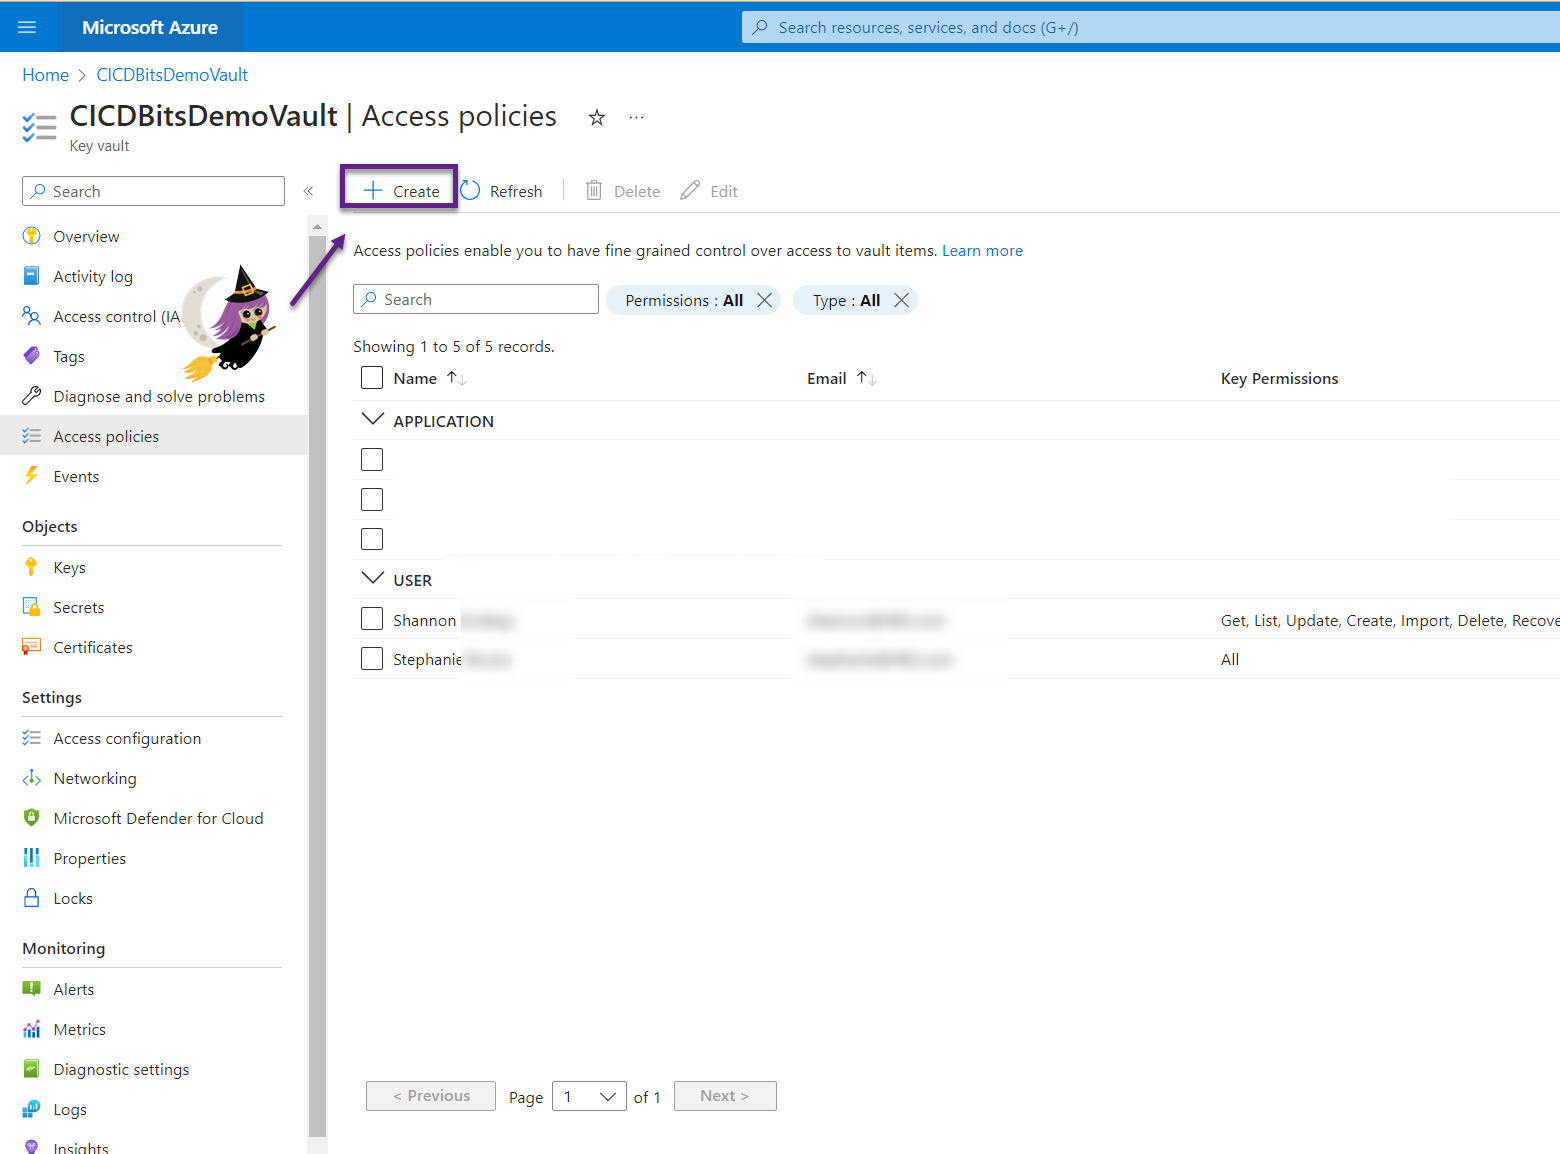
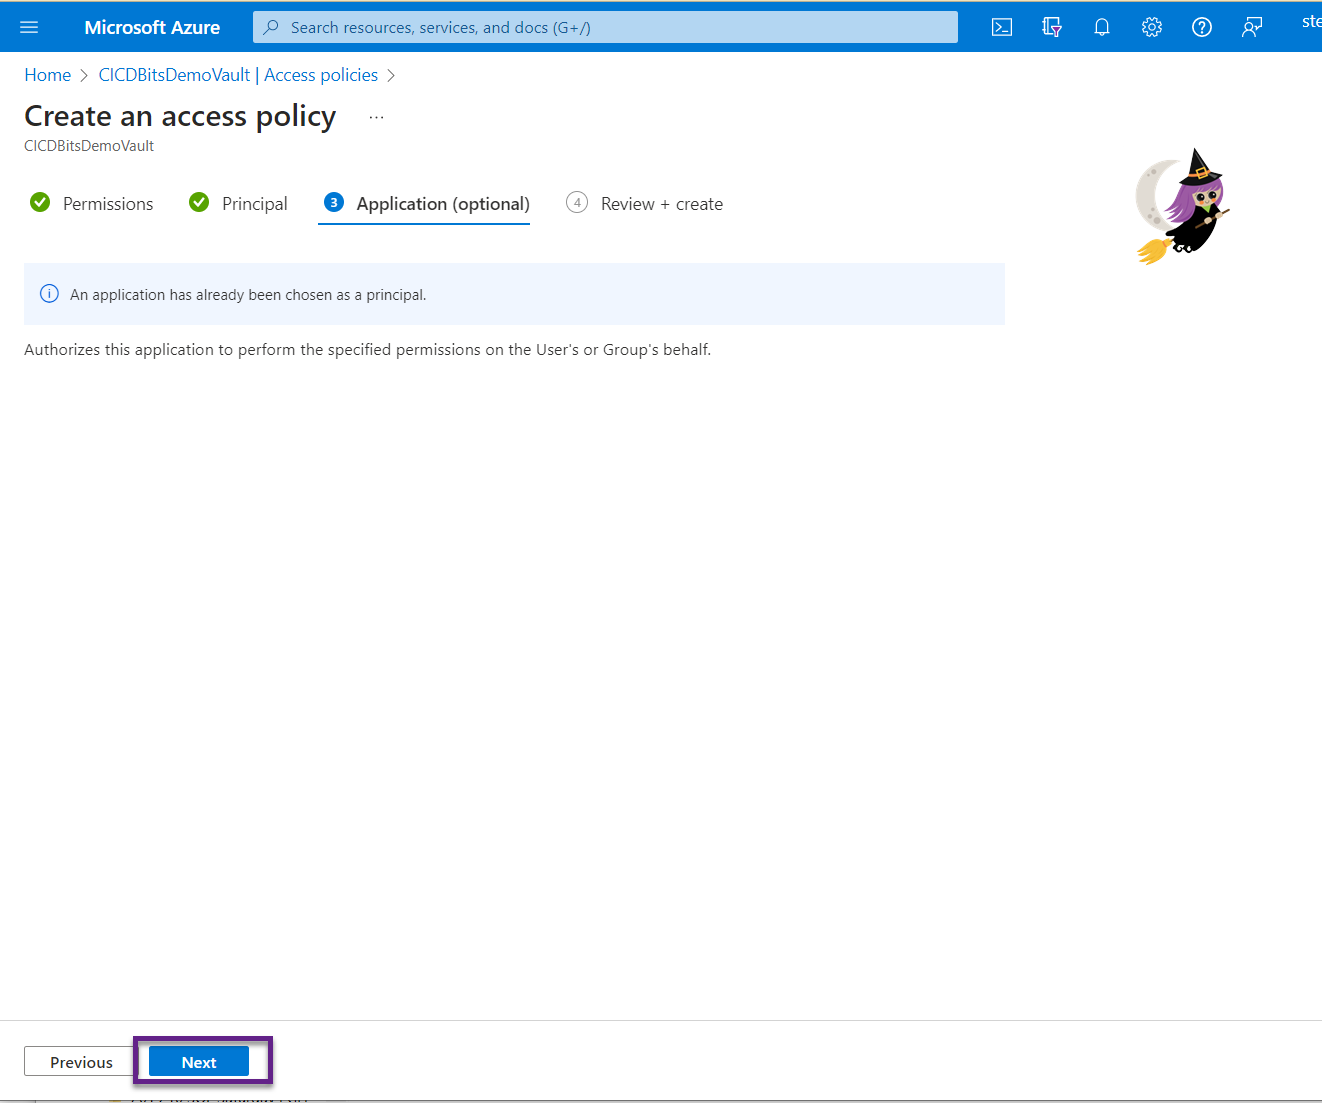
- Click the Create button.
- Under the “Secret permission” section, check both Get and List. Click the Next button.
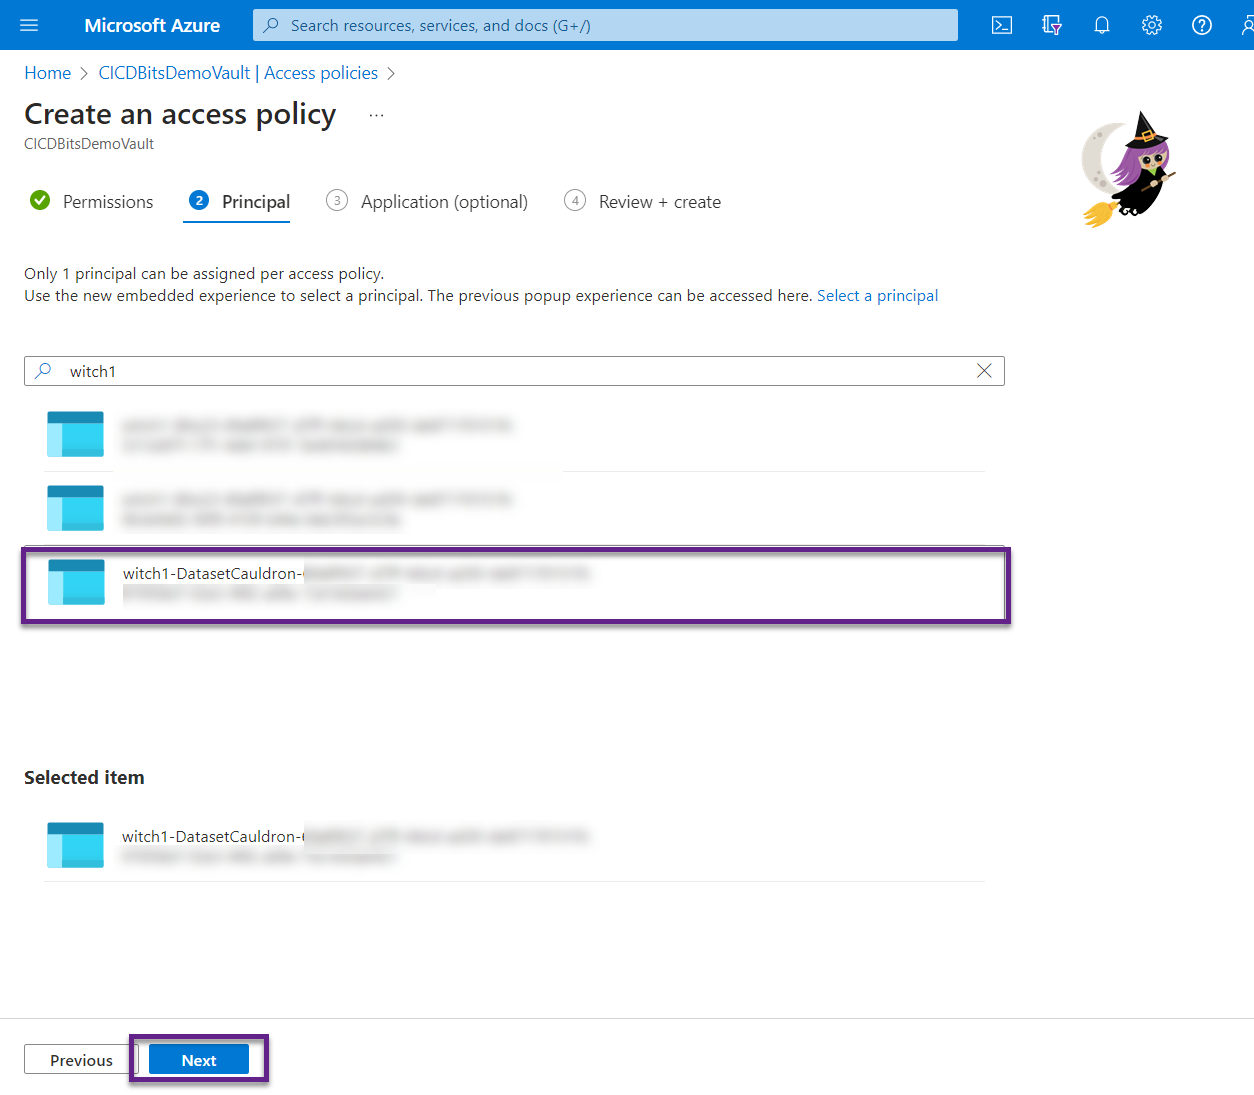
- Find the name of your service connection. Click Next.
- Click Next again.
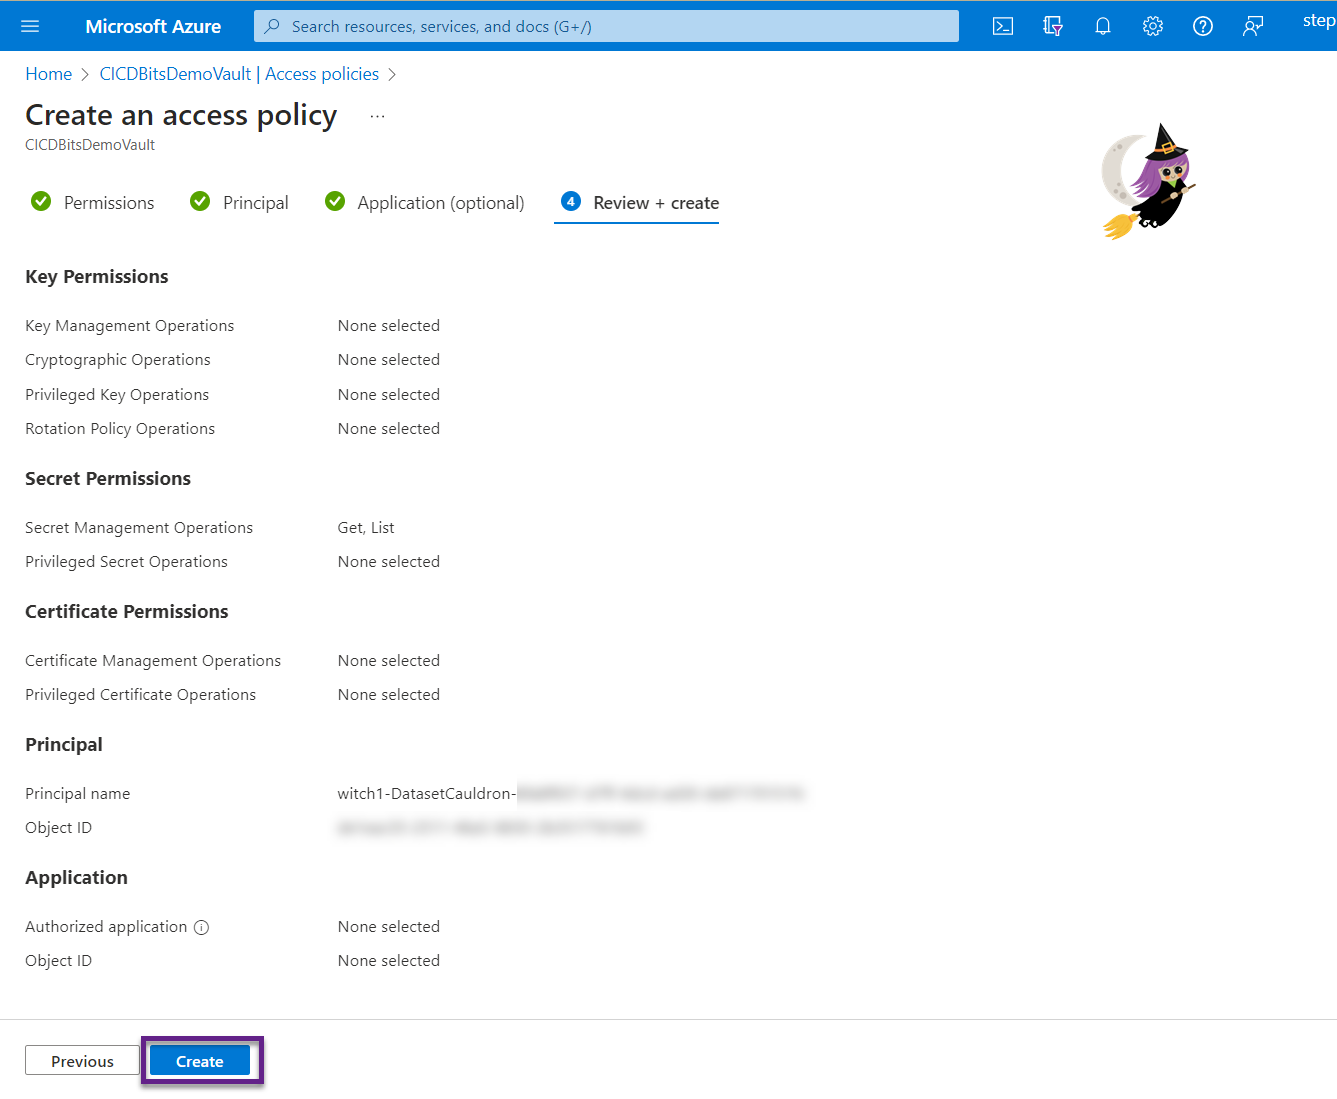
- Review and click Create.
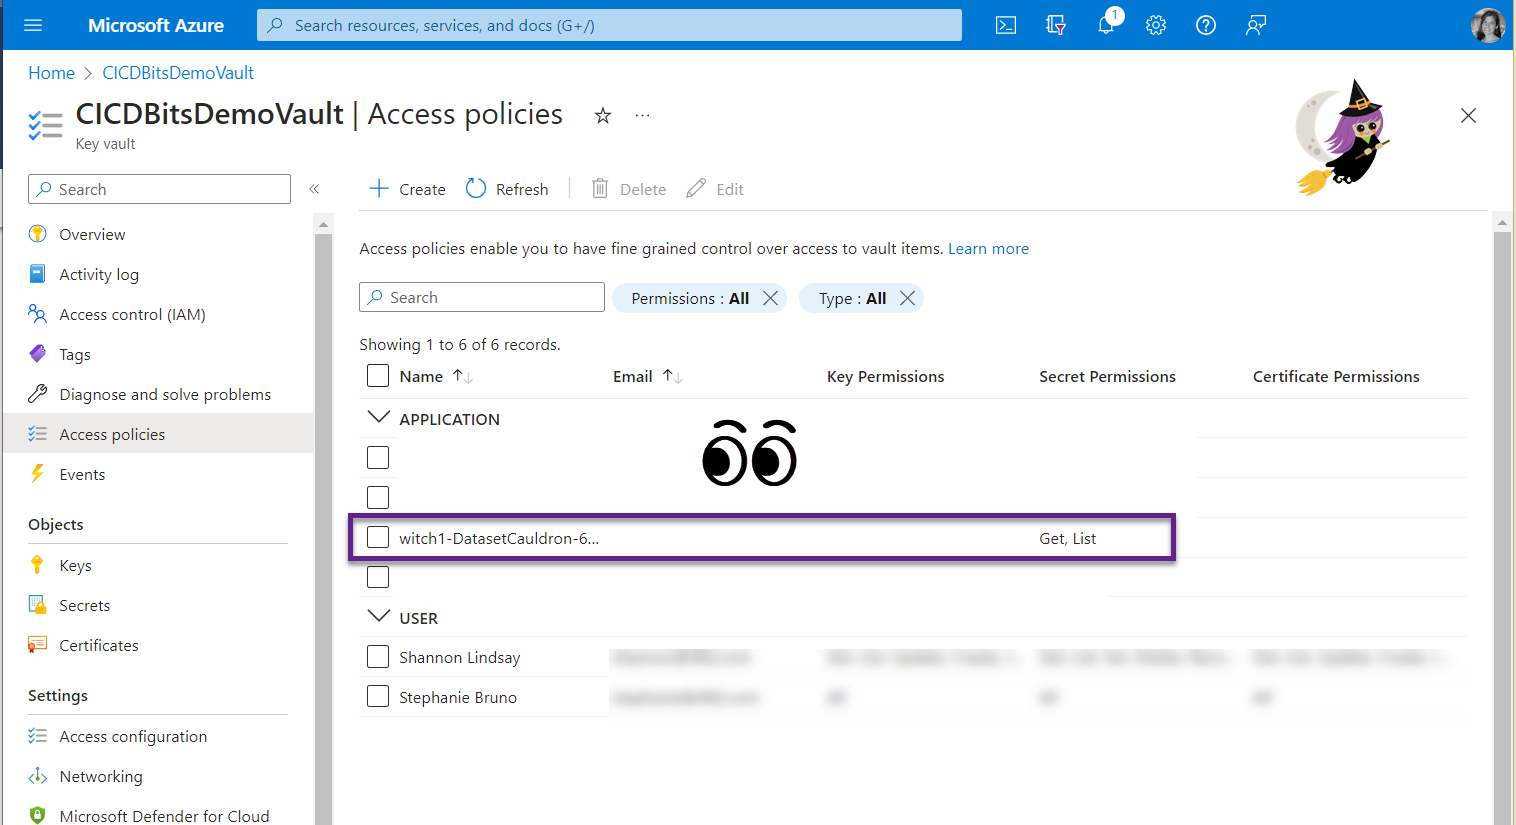
- Notice that your service connection now has the Get and List permissions for secrets.

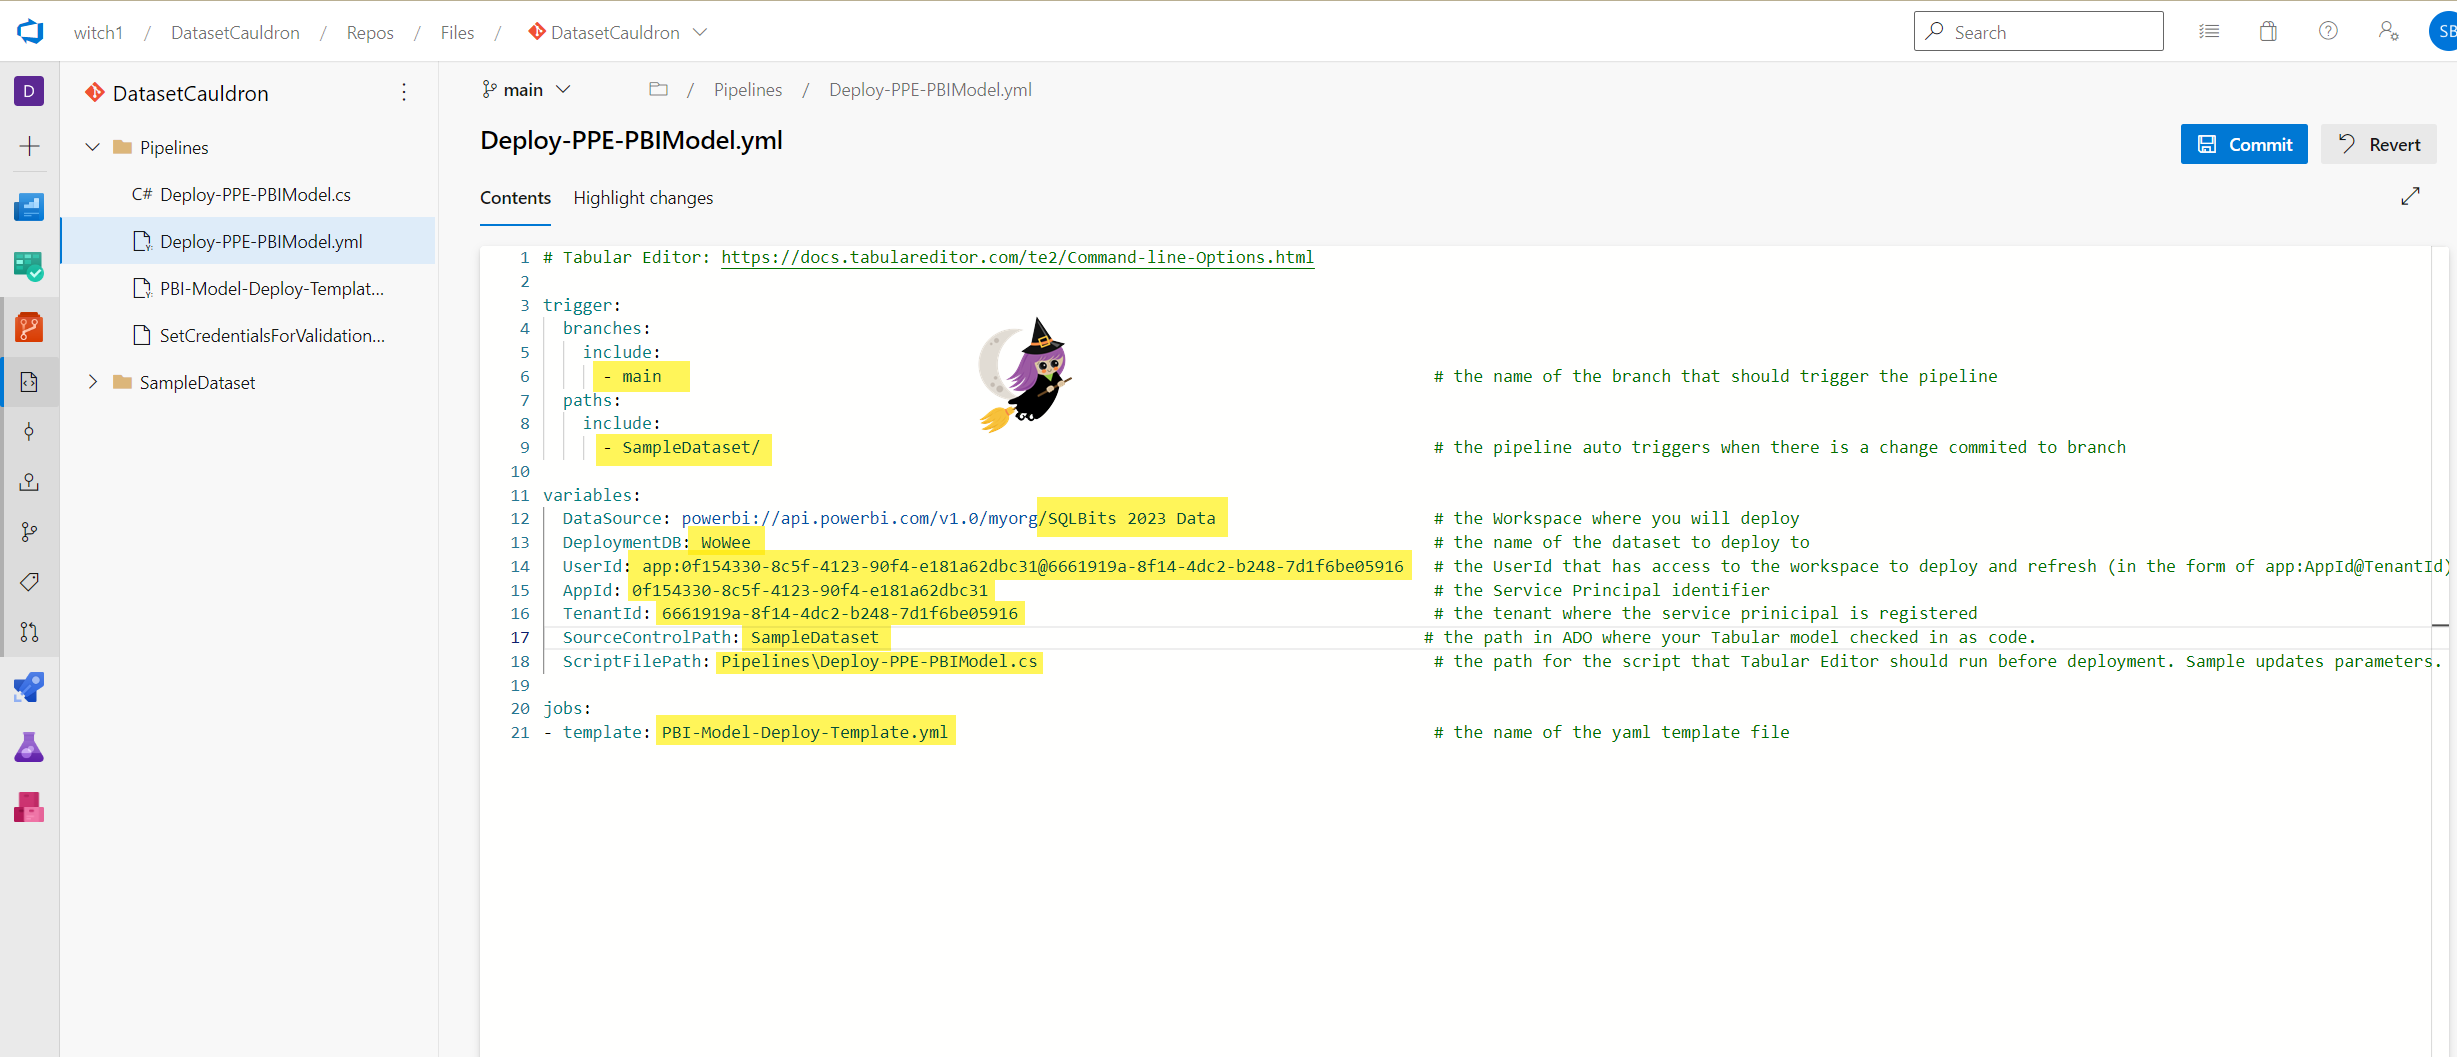
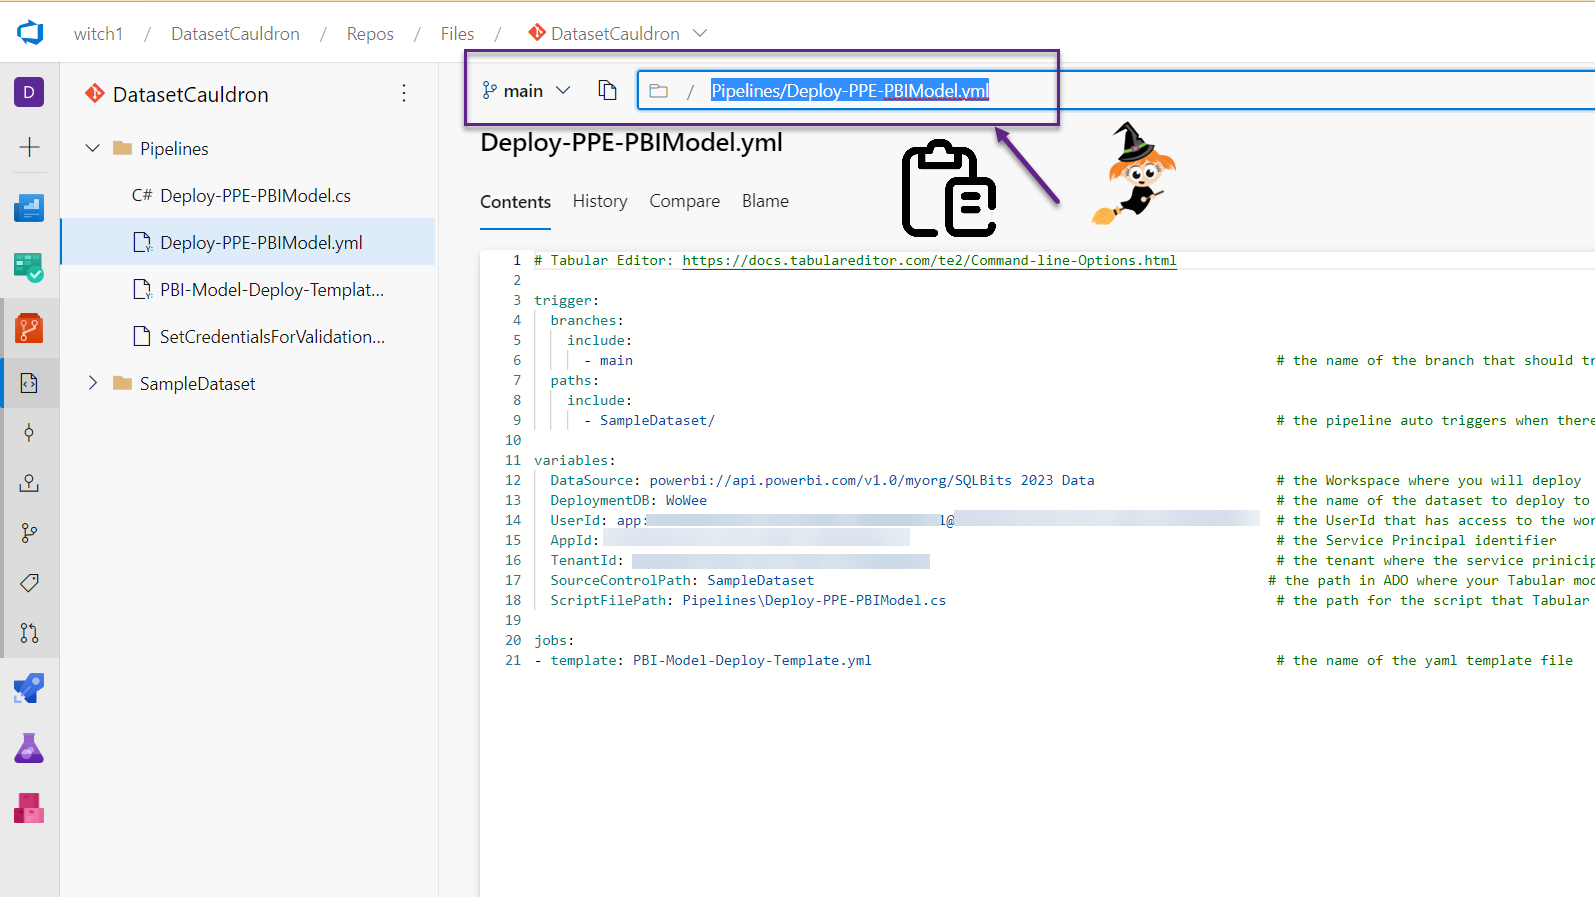
- Open up the “Deploy-PPE-PBIModel.yml” file (you can edit directly in ADO or in VS Code and push your changes to the main branch). This file includes all kinds of variables that you’ll need to edit for your specific tenant. Here are the lines you need to modify:
- trigger:
- branch to include: the name of the branch that has the data model files that you would like to deploy to a workspace. Changes to this branch will trigger the pipeline to run. This exists because you can have multiple branches and multiple pipelines. For example, you can copy these files and use one pipeline for test and another for prod. In our case, it’s “main.”
- path to include: the location of the dataset files. This works in conjunction with the branch to trigger the pipeline. Ours is called “SampleDataset.”
- variables:
- DataSource: the URL for the Power BI workspace you want to deploy the model to. You can get this by going to the workspace and clicking on Settings, and selecting “Premium.” Copy the value in the Workspace Connection field.
- DeploymentDB: the name you want the model to be in the workspace. If a dataset with the same name already exists in the workspace, the pipeline will overwrite it.
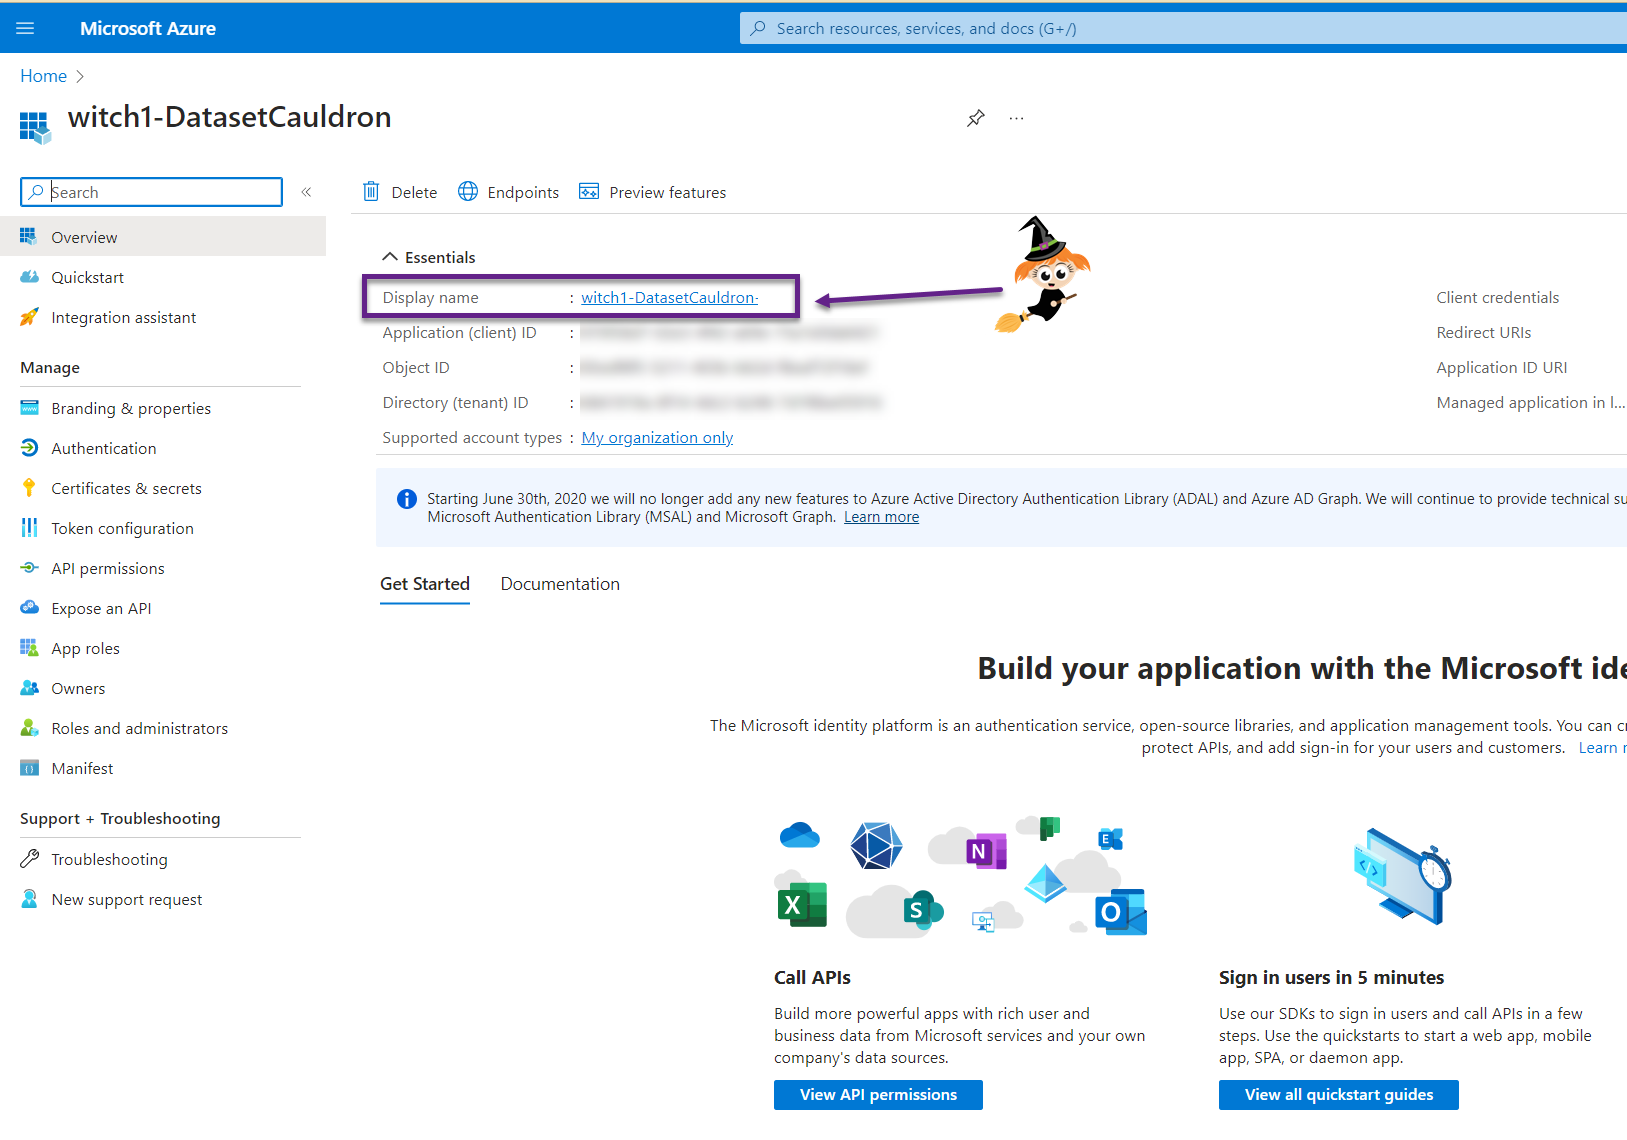
- UserID: the id of the user authenticating to Power BI to publish the model. We used a service principal, which is in the form app:ApplicationID@DirectoryID. You can use different authentication methods, but that is not in the scope of this post.
- AppId: the AppId of the service principal. This is used in the dataset refresh with the Power BI REST API.
- TenantId: the TenantId of the service principal. This is used in the dataset refresh with the Power BI REST API.
- SourceControlPath: the same as the path to include in the trigger.
- ScriptFilePath: the path and name of the .cs script file. If you don’t have any parameters to change in the data model depending on which workspace you’re publishing to, you don’t need to edit the script file. Just keep it as is and refer to it here. It won’t do anything.
- jobs:
- template: the name of the template yaml file. If you haven’t changed the name, then you don’t need to edit this.

- template: the name of the template yaml file. If you haven’t changed the name, then you don’t need to edit this.
- trigger:
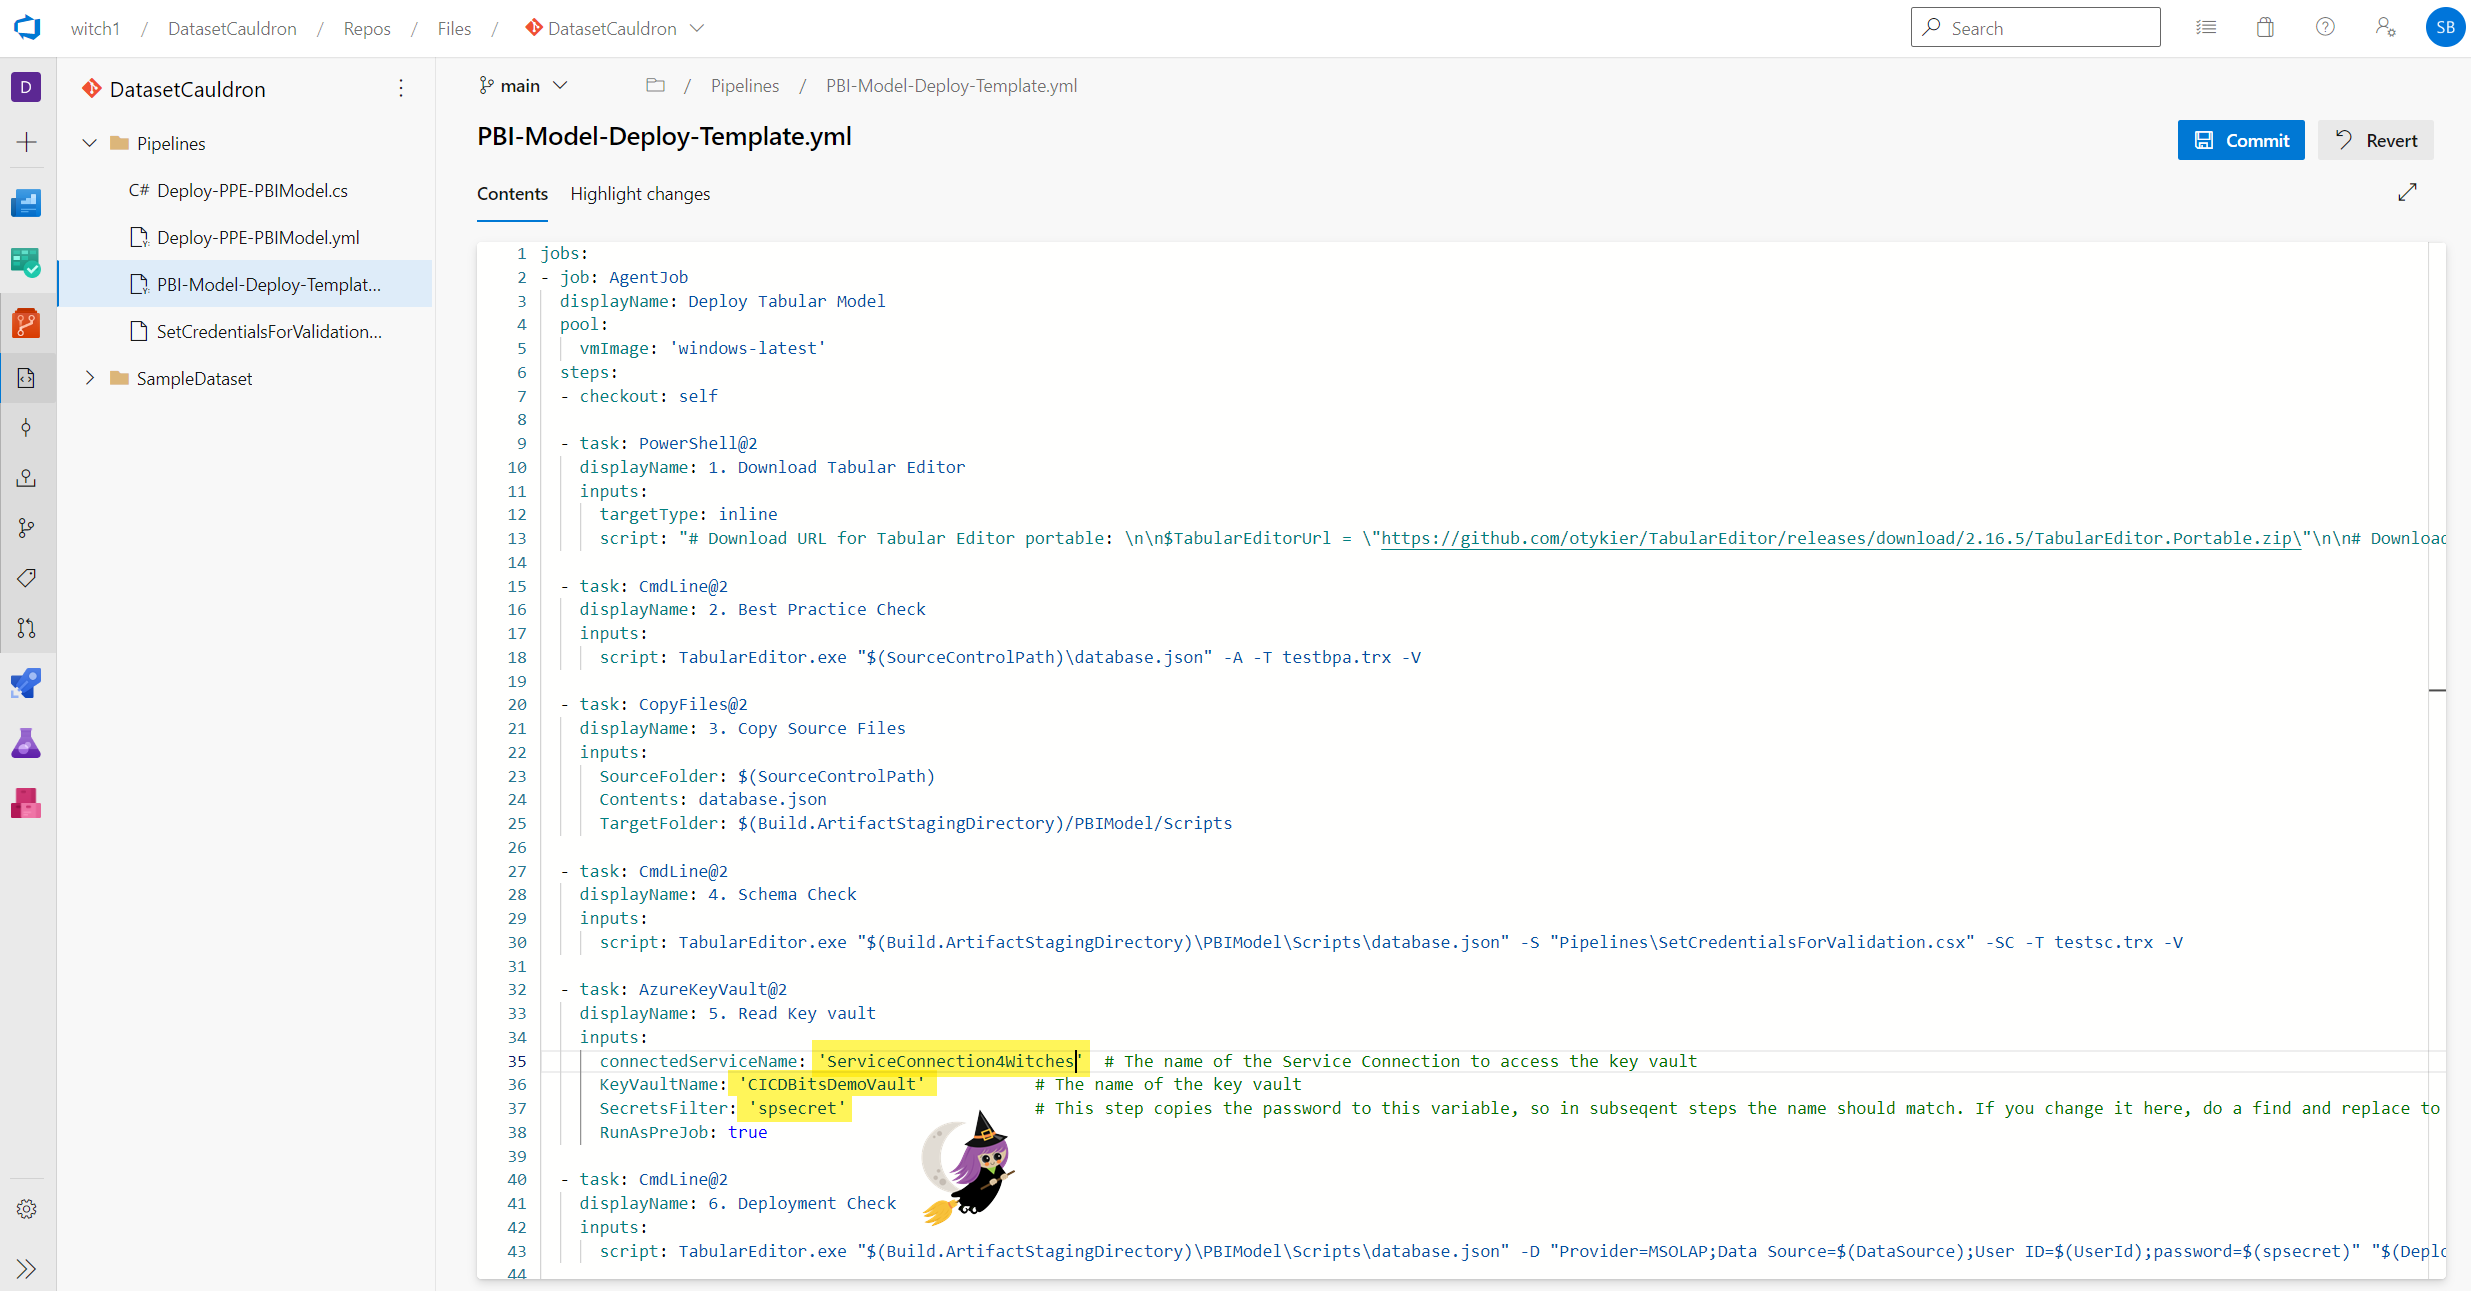
- Open up the PBI-Model-Deploy-Template.yml file. We need to make just a few edits here for accessing the key vault.
- In Task 5: update line 35 with the name of the Service Connection you created earlier. Also update the KeyVaultName (the name of your key vault) and the SecretsFilter (the name of your secret from the key vault).
- You need to update the secret name in a few more places. Do a find and replace, or just go to lines 43 (in task 6), 59 (in task 9), and 67 (in task 10).
- Optionally – you may need to occasionally update the version of Tabular Editor that the pipeline uses (Step 1, Line 13). Check to see the latest version: (if you know of a way to always use the latest version, please let us know in the comments!)
- Commit these changes to the main branch.
- Open up the Deploy-PPE-PBIModel.cs and edit or not.
- The sample cs script overwrites parameters in your dataset with different values when you deploy. This is useful in case you want to use one set of parameters for test and another for prod, for example.
- If you do want to overwrite parameters, you’ll have one line (currently lines 4, 5, and 6 in the sample) for each parameter to overwrite. If you don’t want to overwrite parameters, just comment out these lines.
- This is just one example of how you can use a cs script to modify your dataset upon deployment. For more examples, see the Tabular Editor documentation.
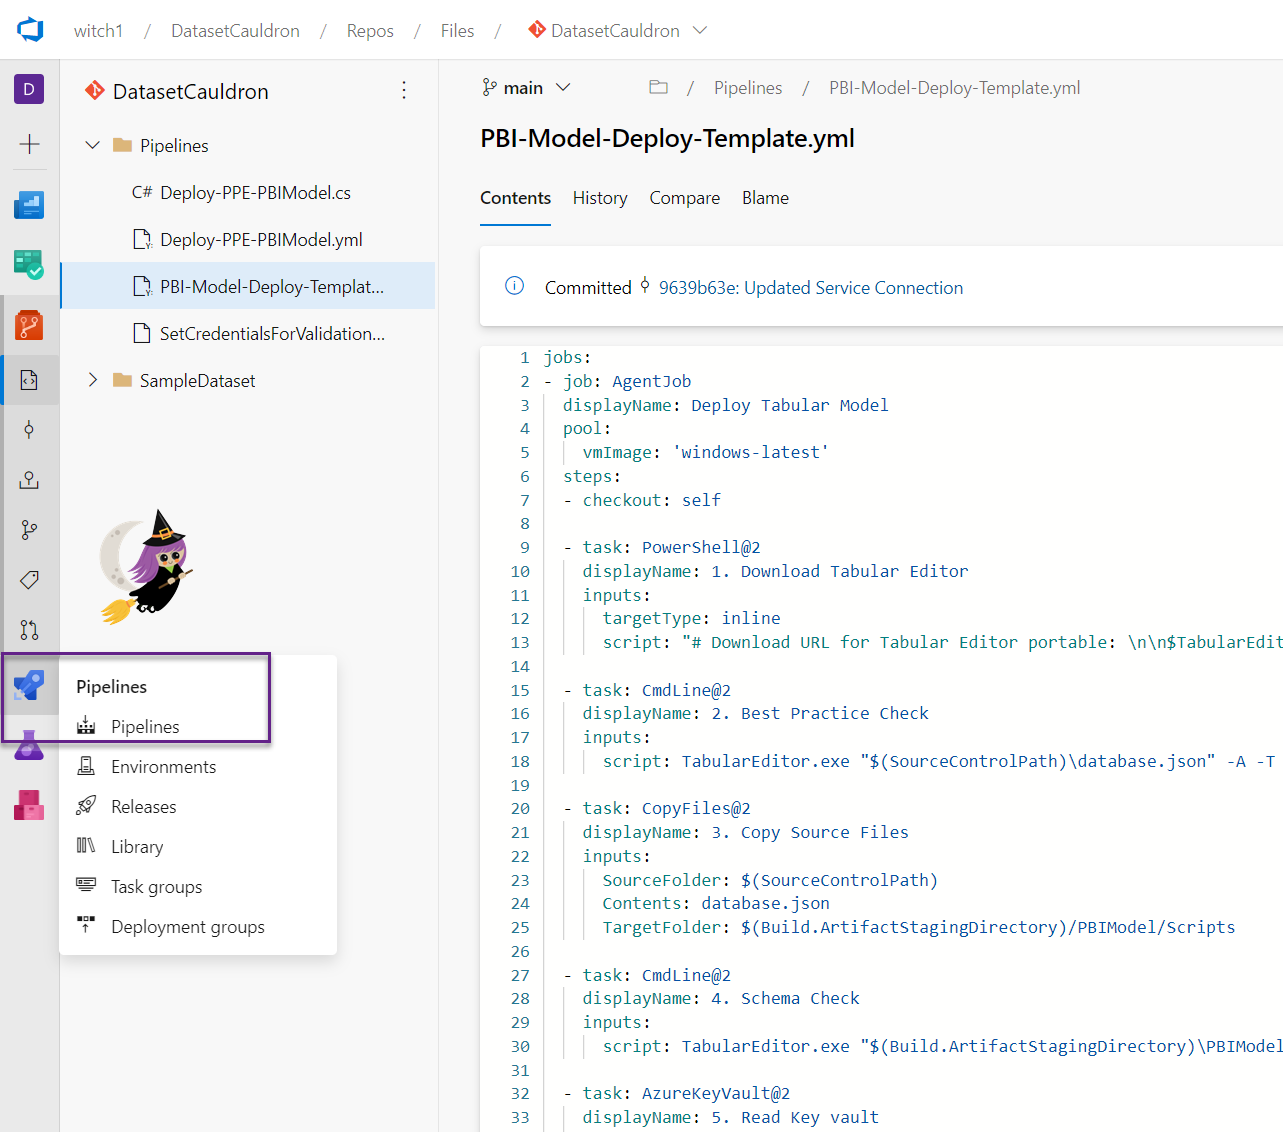
- Create an ADO pipeline
- Click on Pipelines in the Pipelines section of your ADO project
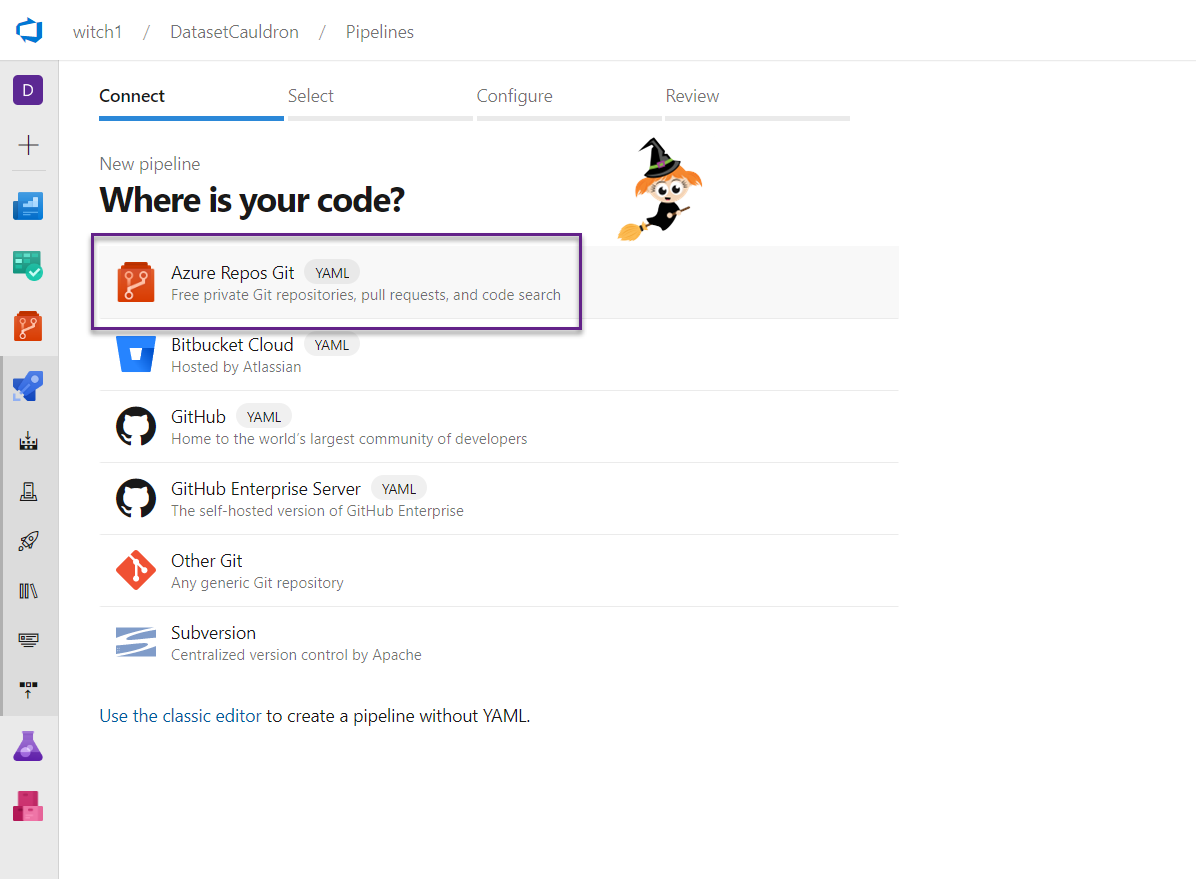
- Click the Create Pipeline button
- Select “Azure Repos Git”
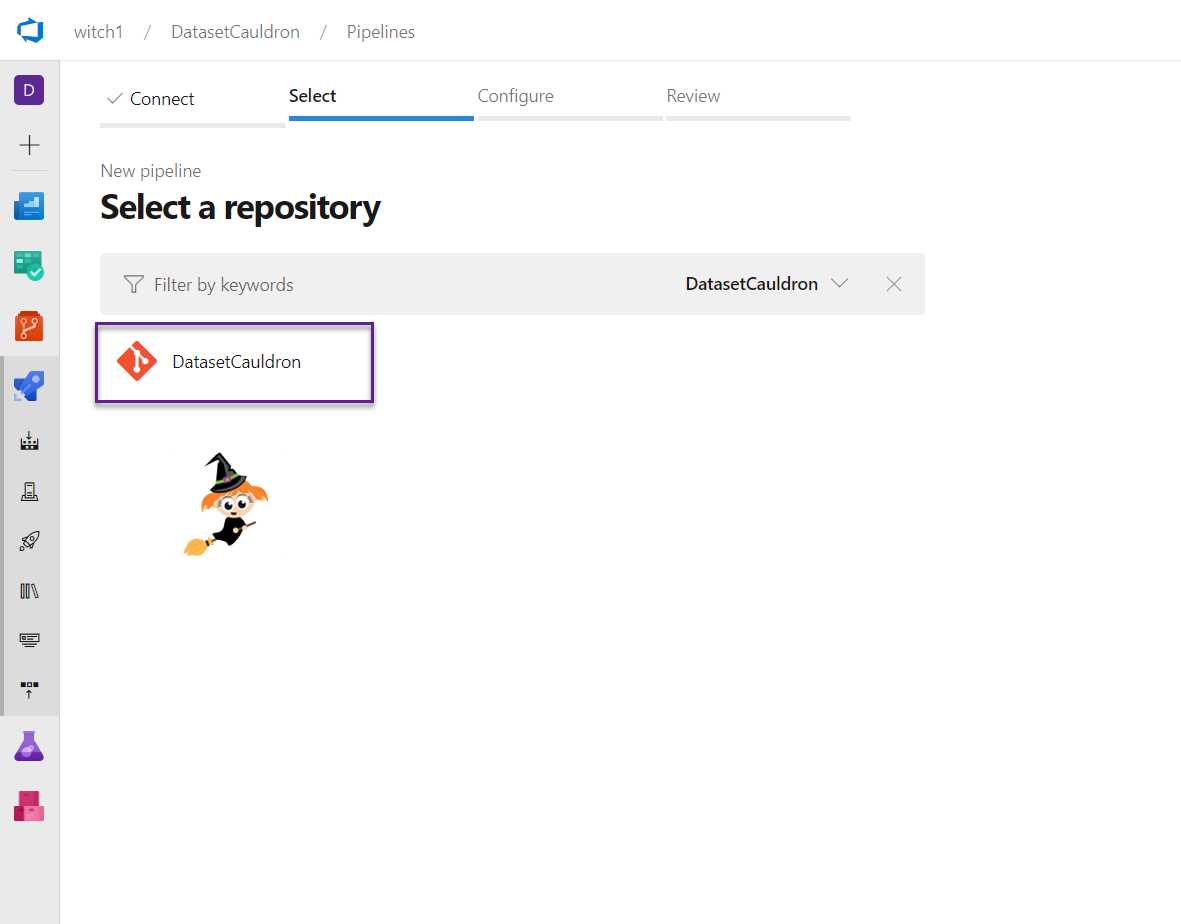
- Select your repo name
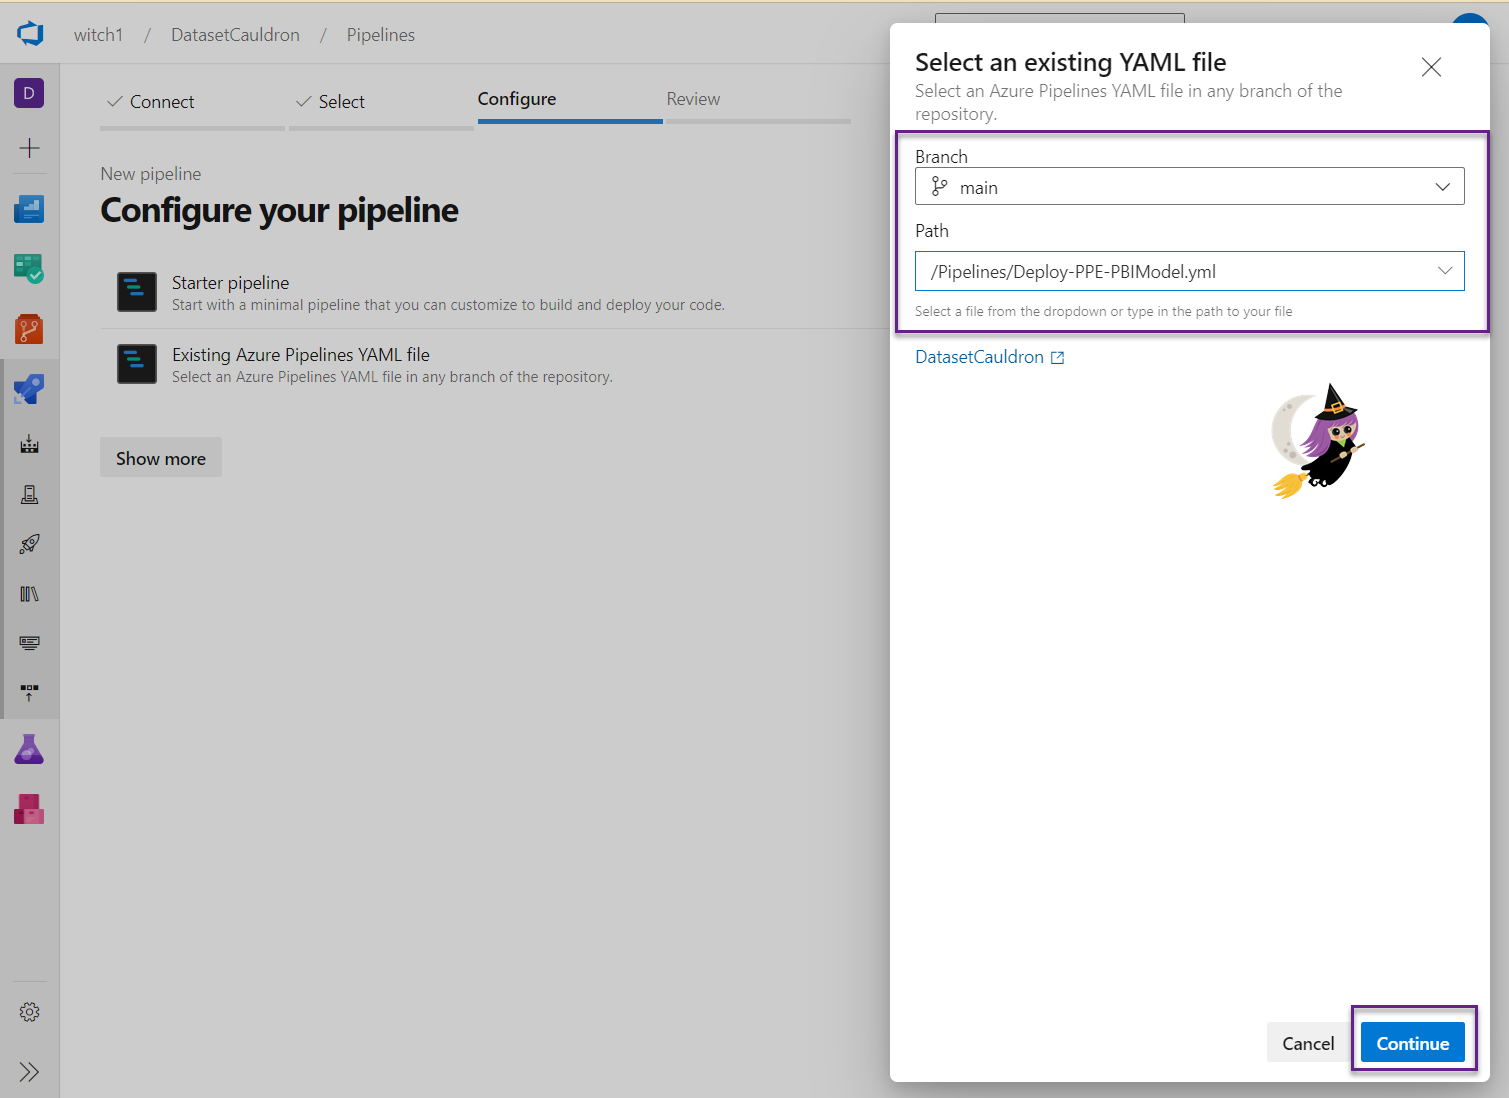
- Choose “Existing Azure Pipelines YAML file”
- In another tab, find and copy the path to the “Deploy-PPE-PBIModel.yml” file in the files section of ADO. Navigate to the file in ADO, then in the top section next to the branch dropdown, you can click on the path and copy from there.
- Select a branch (you can change this later), and in the Path dropdown, paste the path you copied in the last step. Click the Continue button.
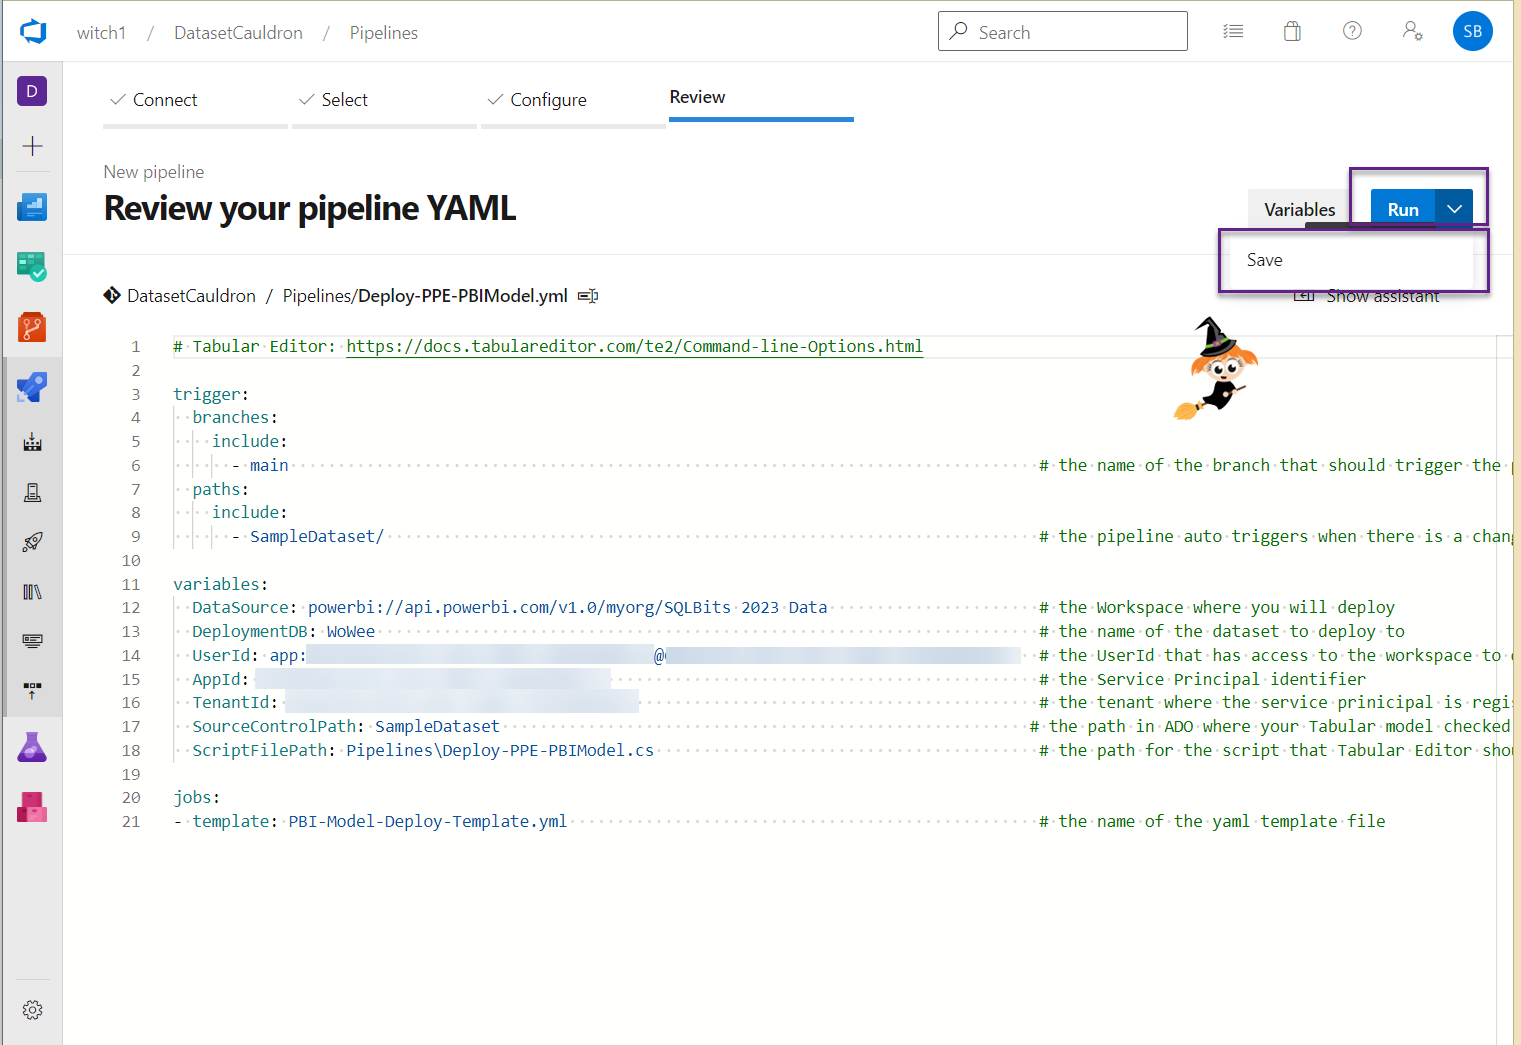
- Click the down arrow next to the Run button and save the pipeline. Click the 3 dots next to Run pipeline and Rename to something helpful and Save. Optionally choose a folder if you’d like to organize it.


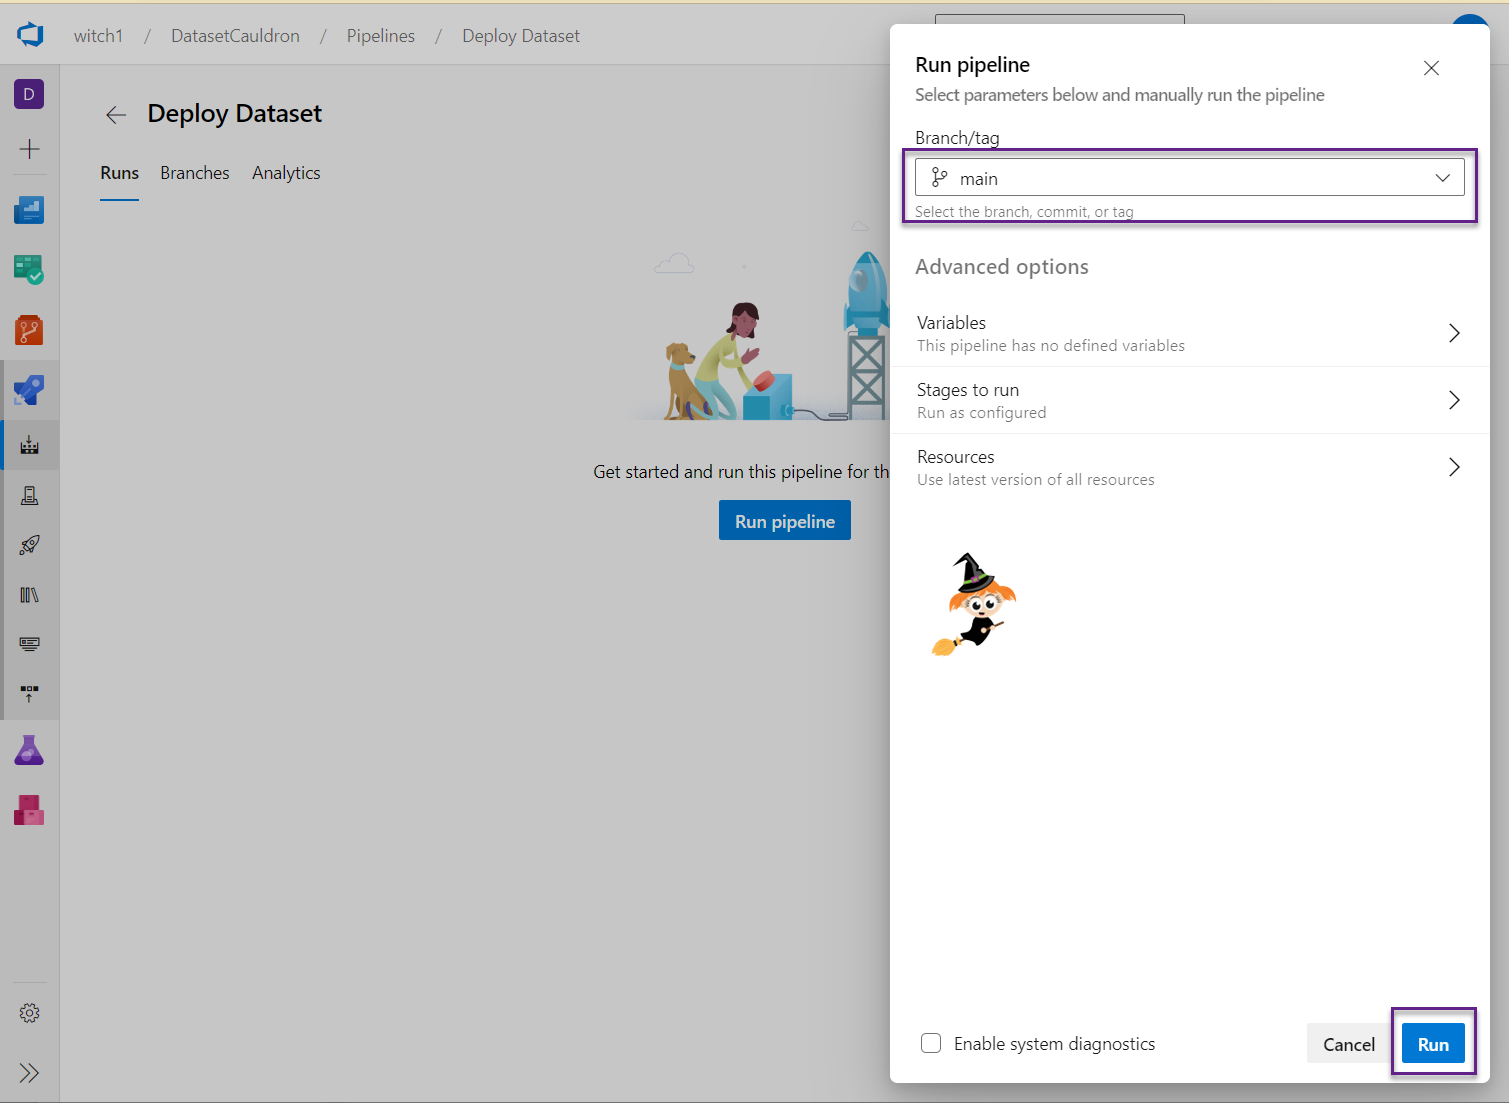
- Run the pipeline!
- Click the Run pipeline button and choose which branch to run it from. You may get an error that says “There was a resource authorization issue” with a button to “Authorize resources”. Go ahead and click that button.
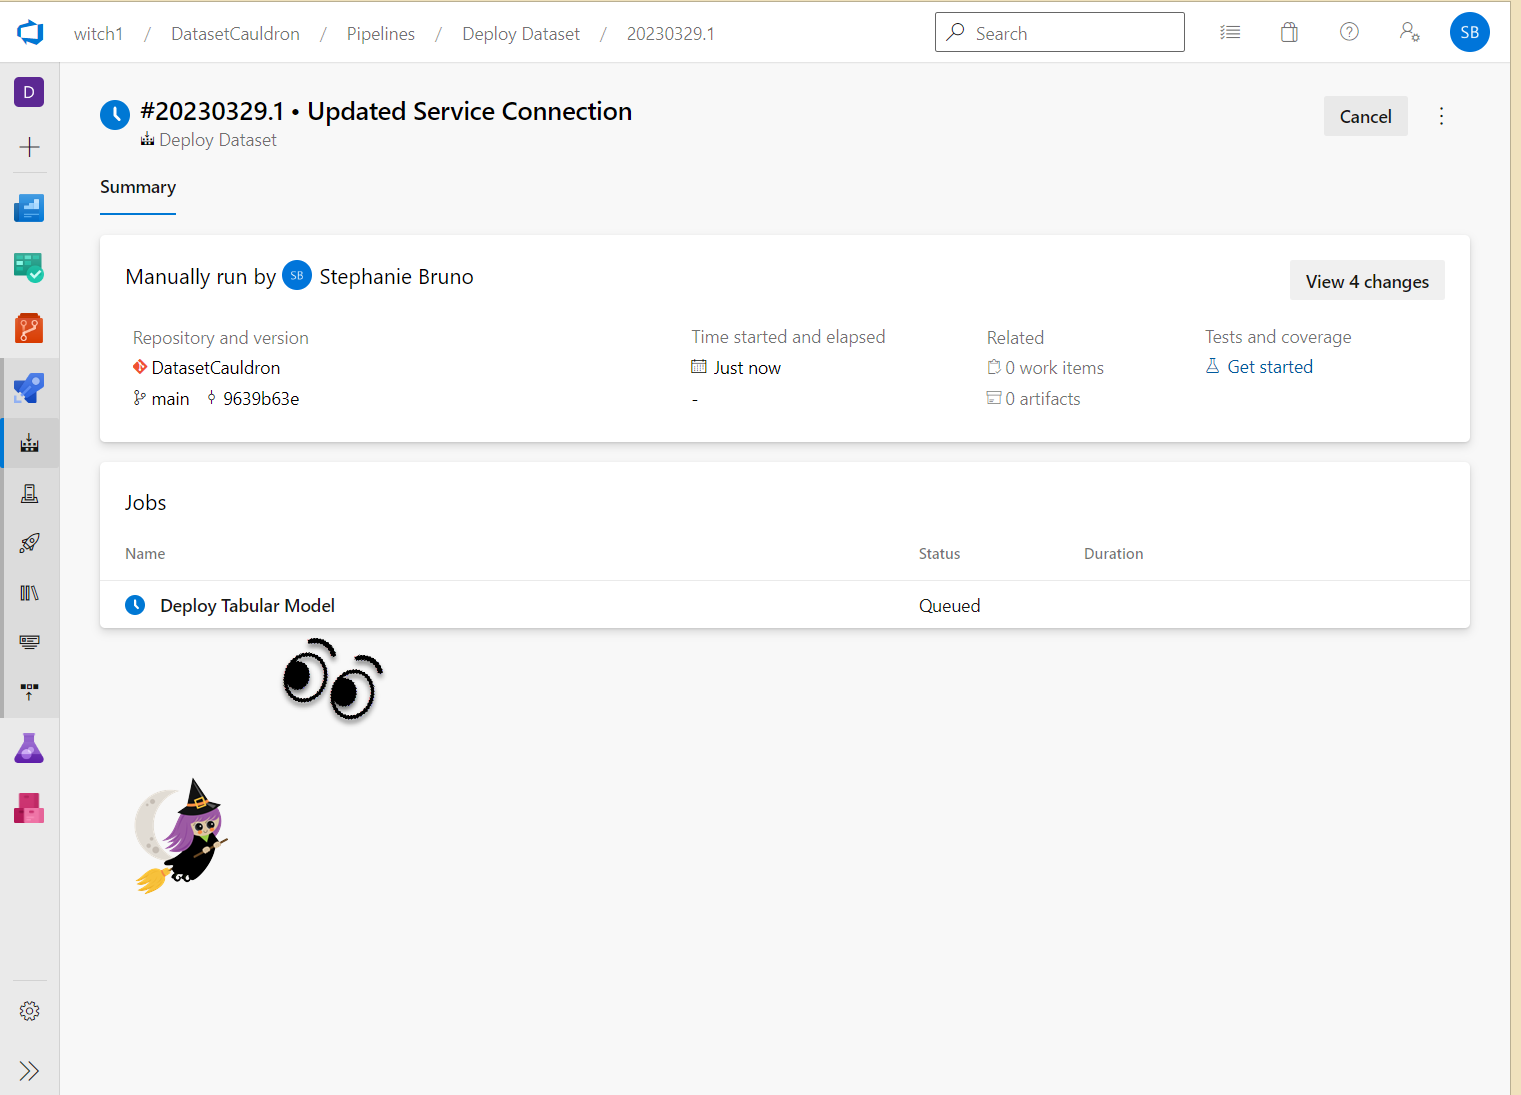
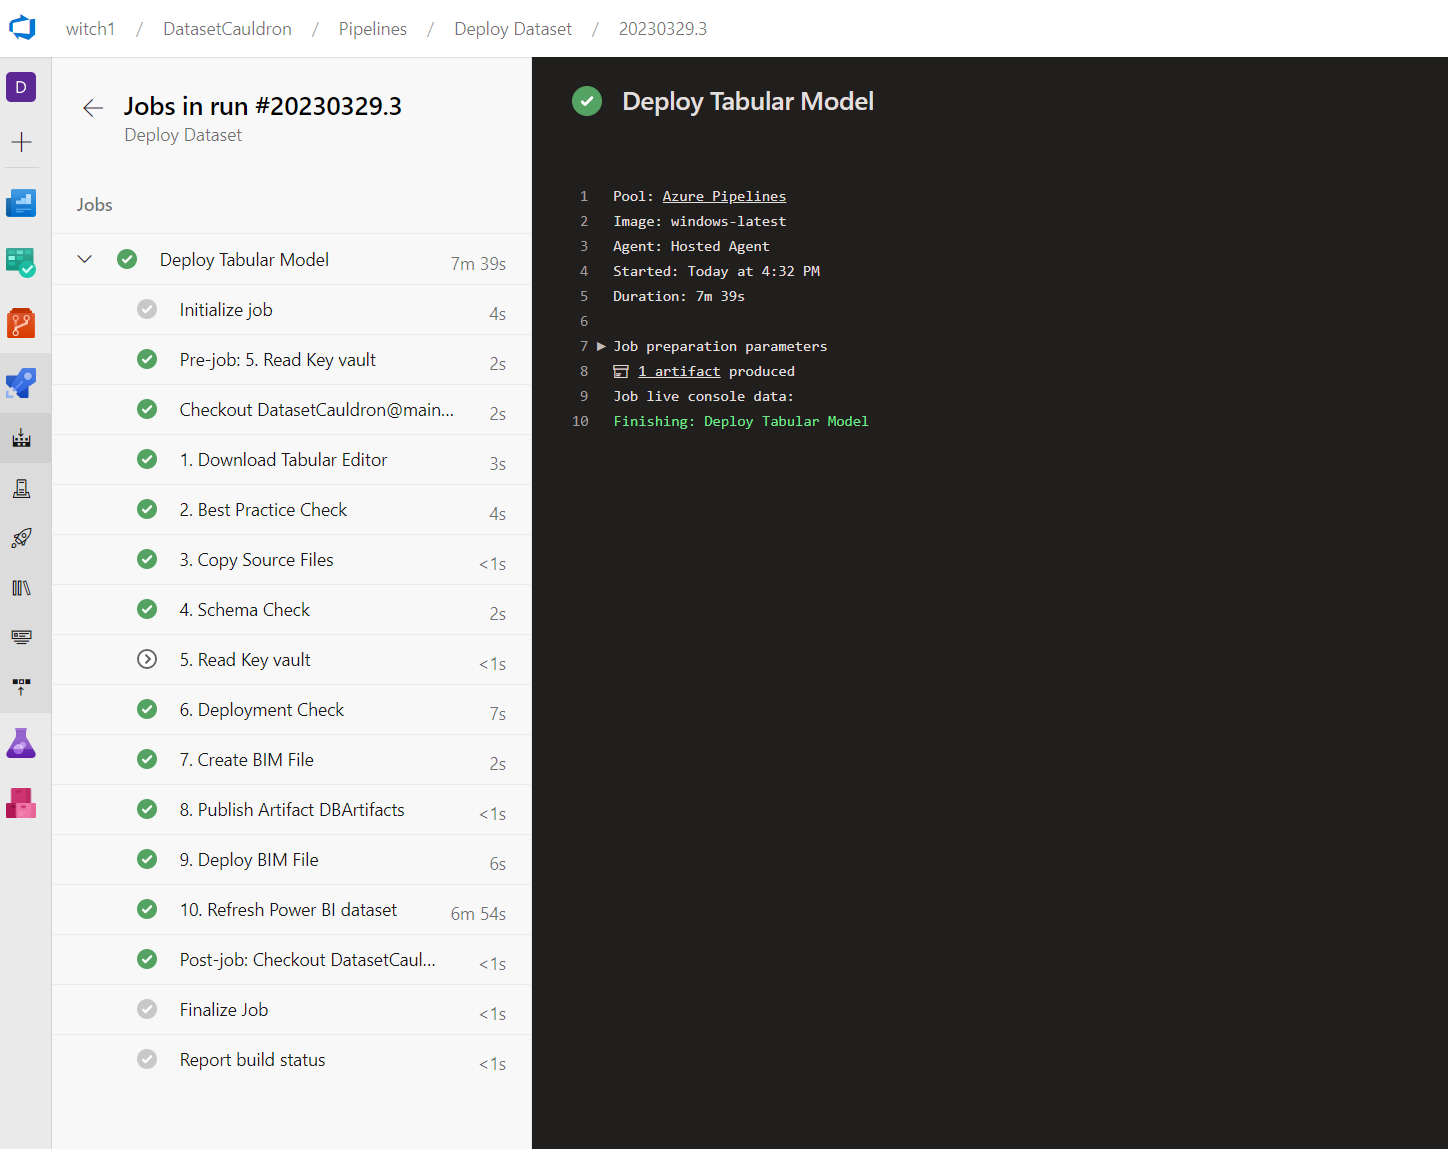
- Watch the status of the job. You can click on the name of the job (Deploy Tabular Model in this case) to see the status of each step.
- Note that the refresh step of the pipeline (Step 10) can be very slow because of the “Install-Module -Name MicrosoftPowerBIMgmt” line. This one piece takes about 6 minutes in our tests.
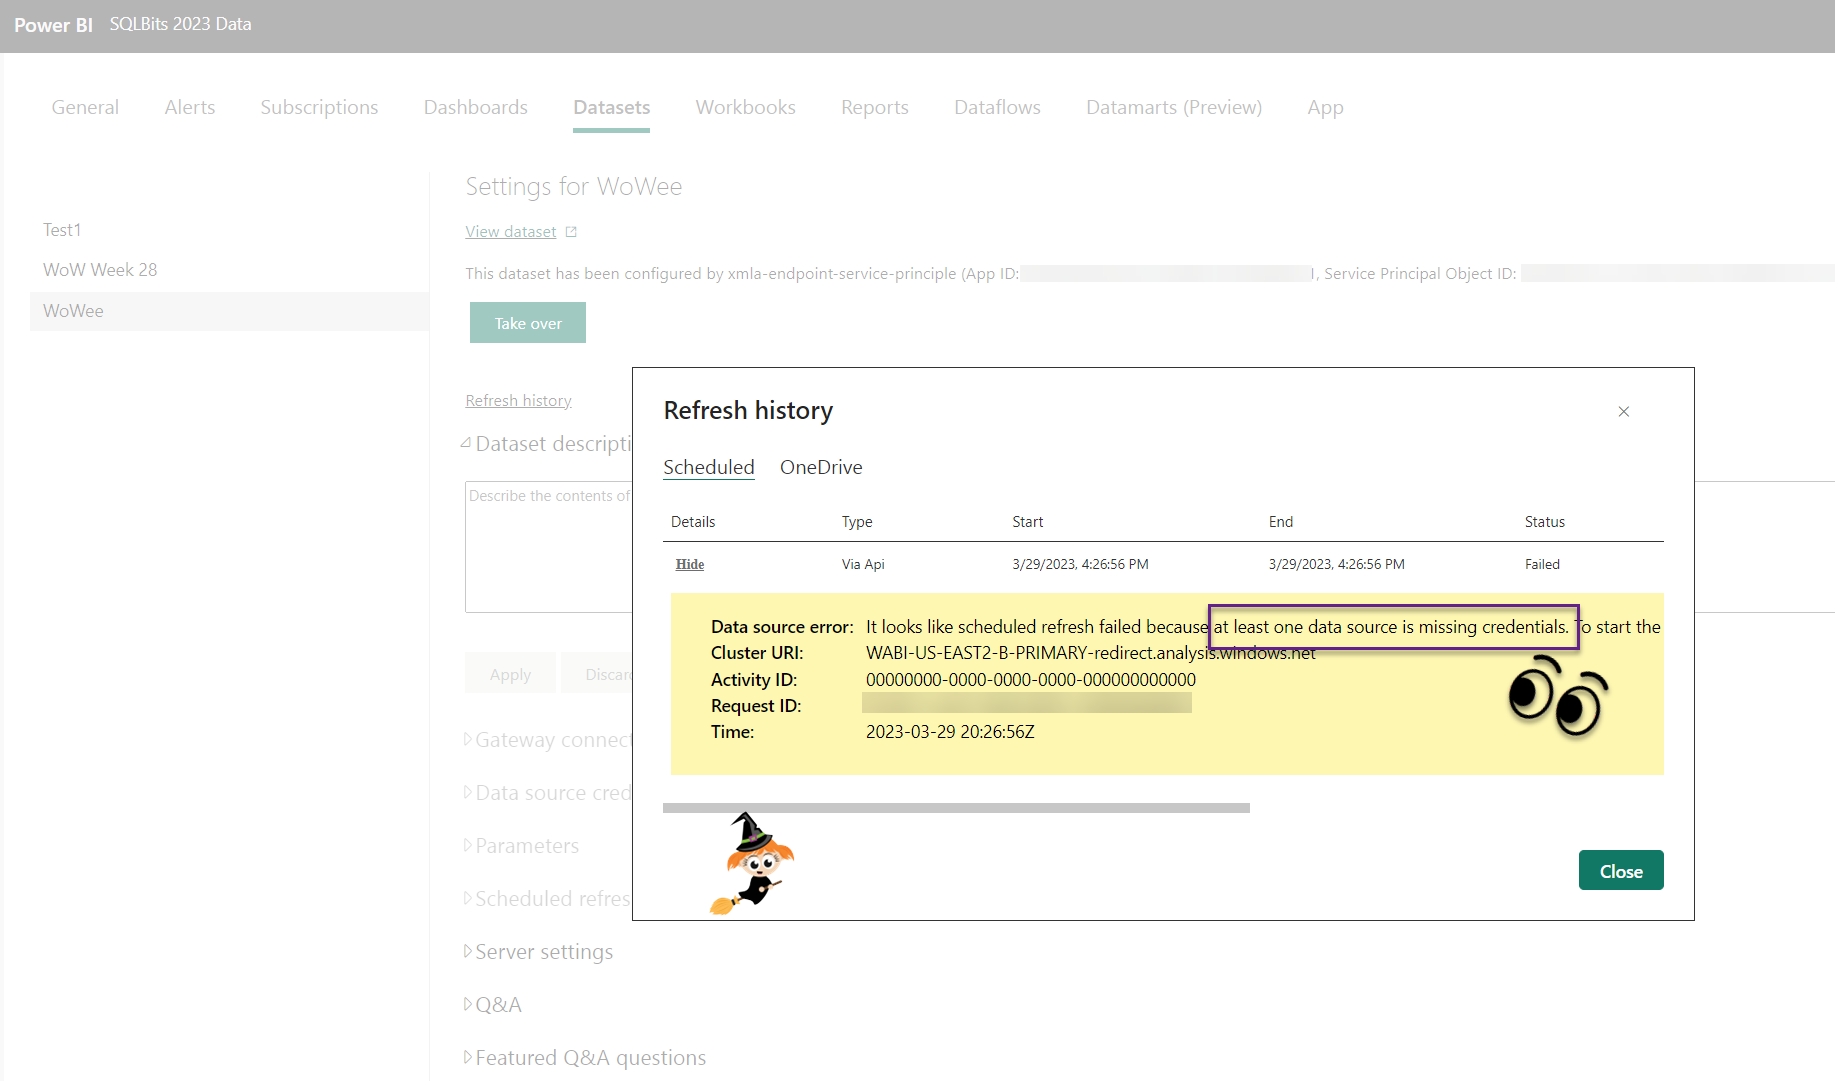
- If this is the first time you are deploying that dataset, then the first refresh will fail because you need to update the credentials for your data sources. Go to the workspace and manually take over the dataset and update the credentials.
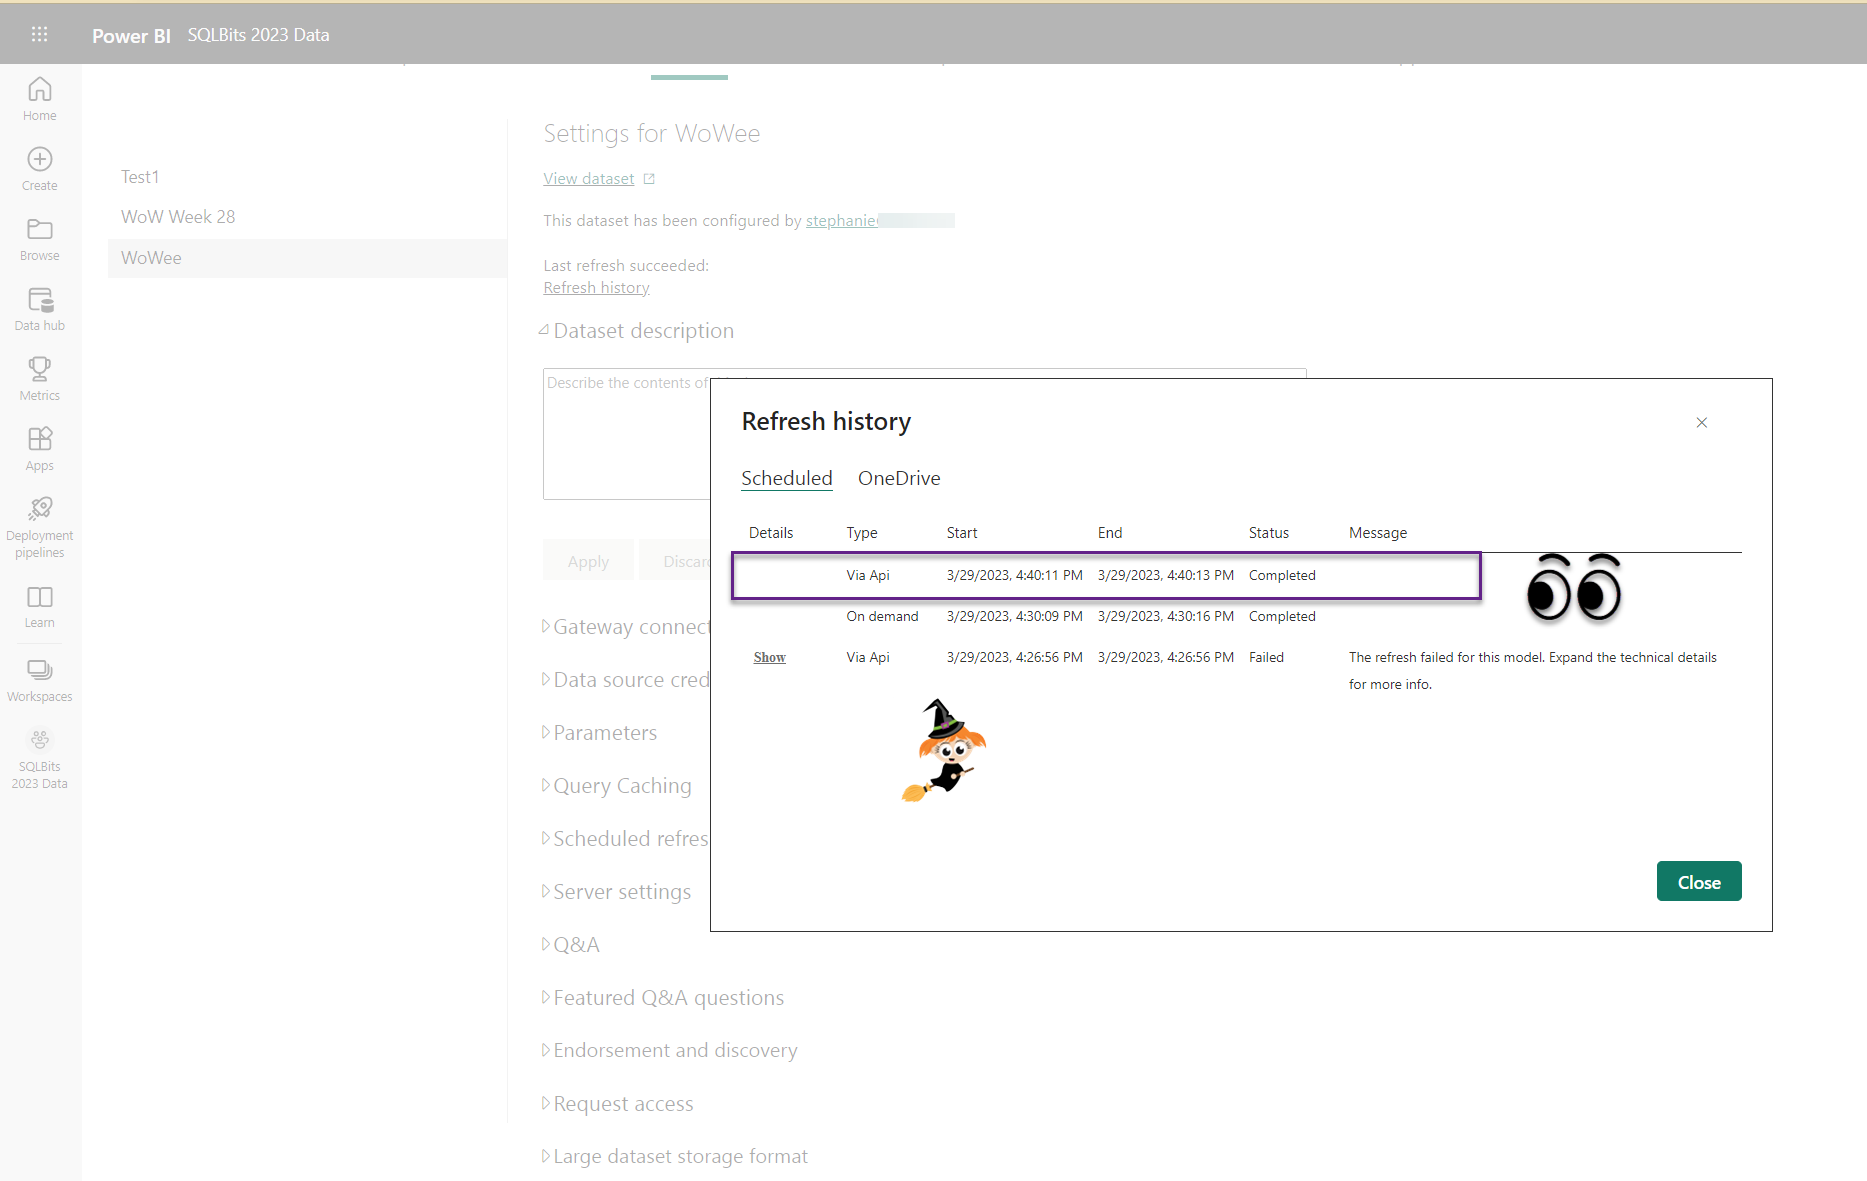
- Rerun the pipeline and make sure it was successfully refreshed by looking in the service.
And that’s it! Congratulations! You have now created a functioning CI/CD solution for your Power BI dataset! From here on out, you’ll just need to use Tabular Editor to save your dataset to your git repo and do a pull request to merge your changes into a branch, which will trigger your pipeline to deploy the changes to your Power BI workspace.
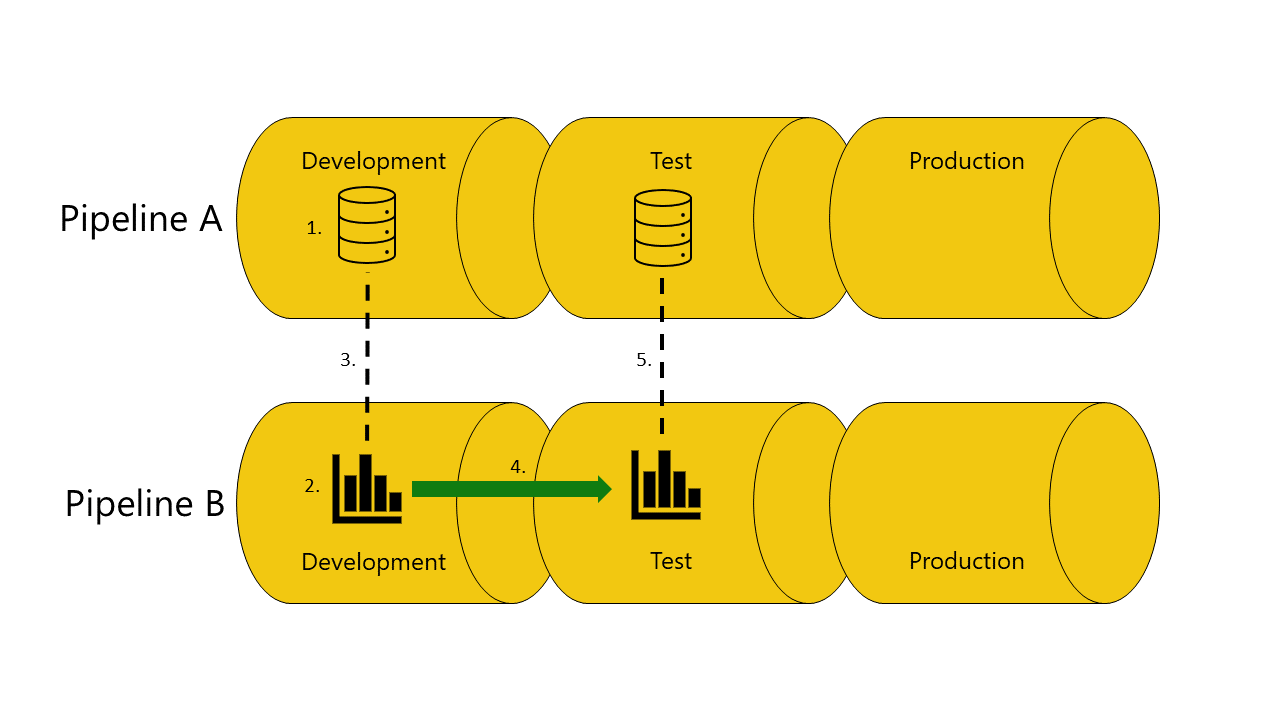
Note that if you are using a separate workspace for your thin reports and you have a Power BI deployment pipeline set up for that workspace, you’ll also need a Power BI deployment pipeline set up for the workspace that your dataset is in (if you’re using dev/test/prod for datasets). This allows your reports to make use of the auto-binding features so that when your reports are in a dev workspace they will point to a dataset in the dev dataset workspace, and magically point to the test dataset when they are pushed through the deployment pipeline to test, and same with prod. See the documentation for more details on auto-binding. I have found that it works best to do a one-time manual deployment of the dataset to the dev workspace and then push it through to test and prod via the Power BI deployment pipeline. This keeps everything nicely connected, and allows you to set up data source credentials from the start. After that one-time deployment, use the CI/CD process for all future deployments.
Many thanks to my colleague, Guru Vijayarao, for developing the initial yaml files and teaching me how to create ADO pipelines. His version of the yaml files can be found here. That version uses a slightly different method of authentication (no service principal) and dataset refresh (without the Power BI REST API). There is certainly more than one way to do this, so find the one that works best for you.
Thanks to the Power BI community, who we consistently rely on for help. Thanks to John Kerski, Adam Saxton, Patrick LeBlanc, and our dear friend ChatGPT 😉.
Double, double toil and trouble;
Fire burn and caldron bubble.
Comments
5 responses to “Power BI datasets CI/CD (the easy-ish way)”
[…] Stephanie Bruno does a bit of continuous integration: […]
Is there a way to pass the parameters from YAML to the cs script? I haven’t been able to figure that out yet…
I’m not sure! Were you able to figure it out?!
Nice Guide, Really Useful!
To always get the latest version of Tabular Editor; change the link to:
“https://github.com/TabularEditor/TabularEditor/releases/latest/download/TabularEditor.Portable.Zip”
[…] the deployment solution covered in the post about Power BI datasets CI/CD by Stephanie Bruno (l/x/b) or the Microsoft Fabric DataOps Patterns solution by John Kerski […]